
Documentation
Everything you need to know about using our products
Product Importer Guide
Version: 2.0.4 | Last Updated: January 12, 2026 | Scope: Admin UI Pages (Sidebar → Pages → Tabs/Steps → Blocks)
This User Guide provides a comprehensive overview of the Product Importer for WooCommerce plugin. It covers every screen, feature, troubleshooting, and best practices for both Free and Pro users.
Whether you're importing products for the first time or automating recurring updates, this guide will help you navigate the plugin effectively.
The guide is designed for WooCommerce store owners, admins, and support teams. It assumes basic familiarity with WordPress and WooCommerce. For technical support, refer to the Troubleshooting section or contact us via the Help/Docs page.
Table of Contents
Plugin Installation
How to install Product Importer
Product Importer is available in two editions: Free (from WordPress.org) and Pro (purchased from badamsoft.com).
Installing the Free version
- Log in to your WordPress admin dashboard.
- Navigate to Plugins → Add New.
- In the search field, type "Product Importer".
- Locate the plugin by BadamSoft LLC and click Install Now.
- After installation completes, click Activate.
The plugin will appear under WooCommerce → Product Importer.
Installing the Pro version
- Purchase and download the Pro ZIP file from badamsoft.com.
- In your WordPress dashboard, go to Plugins → Add New → Upload Plugin.
- Click Choose File, select the downloaded ZIP, and click Install Now.
- After installation, click Activate Plugin.
Upon activation, you will be prompted to enter your license key (see License Activation below).
System Requirements
Minimum requirements for running the plugin
To ensure optimal performance and compatibility, Product Importer requires the following:
- • WordPress: 6.2 or higher
- • WooCommerce: 8.0 or higher
- • PHP: 7.4 or higher (PHP 8.3+ recommended for best performance)
- • MySQL: 5.6 or higher (recommend MySQL 8.0 or greater)
- • MariaDB: 10.1 or higher (recommend MariaDB 10.6 or greater)
- • Memory Limit: At least 256 MB (512 MB recommended for large imports >10,000 products)
- • Max Execution Time: At least 300 seconds (5 minutes) for large imports
We strongly recommend PHP 8.3 or greater and MySQL 8.0 or MariaDB 10.6 or greater for improved speed, security, and compatibility with modern WooCommerce features.
The plugin is tested up to WordPress 6.9 and WooCommerce 10.4.2.
License Activation
Activate your license key
License activation is required only for the Pro version and enables automatic updates, priority support, and full access to Pro features.
- After activating the Pro plugin, navigate to WooCommerce → Product Importer → Settings → License.
- Enter your license key (provided in your purchase confirmation email from badamsoft.com).
- Click Activate License.
Upon successful activation:
- The license status will show as Active.
- Remaining activations and expiration date (if subscription-based) will be displayed.
- Automatic updates will become available via Plugins → Installed Plugins.
Managing Licenses
- Click Manage Domains to view or revoke activations on other sites.
- To deactivate, click Deactivate License (useful when moving to a new domain).
License validation occurs periodically in the background. No personal data is transmitted beyond the license key and site URL.
Updating the Plugin
Keep your plugin up to date
Free Version (WordPress.org)
FreeUpdates are delivered automatically through the standard WordPress update system:
- Go to Dashboard → Updates or Plugins → Installed Plugins.
- If an update is available, click Update Now.
Pro Version
ProAfter license activation, Pro updates are delivered via the Easy Digital Downloads (EDD) Software Licensing system:
- Ensure your license is active (Settings → License).
- Updates appear alongside other plugins in Dashboard → Updates or Plugins → Installed Plugins.
- Click Update Now when available.
Always back up your site before updating. Changelog is available in the plugin's readme.txt and on badamsoft.com.
1. Introduction
What This Plugin Does
Product Importer for WooCommerce enables you to import products into your WooCommerce store from various data sources (CSV, XML, JSON, Google Sheets, FTP/SFTP, API endpoints). It supports creating new products, updating existing ones, and handling complex product types (Simple, Variable, Grouped).
Minimum Requirements
- • WordPress: 6.2 or higher
- • WooCommerce: 8.0 or higher
- • PHP: 7.4 or higher (PHP 8.1+ recommended)
- • Memory Limit: 256 MB minimum (512 MB recommended for large imports)
Before You Start: Key Decisions and Best Practices
- Always backup your database before running imports
- Test imports on a staging site first
- Prepare your data source (clean CSV/XML/JSON with proper column headers)
- Understand your product types (Simple vs Variable vs Grouped)
- Plan your field mapping strategy (which columns map to which WooCommerce fields)
2. Free vs. Pro Feature Comparison
| Feature | Free | Pro |
|---|---|---|
| Upload File (CSV) | ✓ | ✓ |
| Import from URL | — | ✓ |
| FTP/SFTP Import | — | ✓ |
| Google Sheets Integration | — | ✓ |
| API Endpoint (REST) | — | ✓ |
| Field Mapping (Drag & Drop) | ✓ | ✓ |
| Save Import Profiles | 1 profile | Unlimited |
| Scheduled Imports (Cron) | — | ✓ |
| Import History (Full) | Last 12 | Unlimited |
| Variable Products Support | — | ✓ |
| Grouped Products Support | — | ✓ |
| Priority Support | — | ✓ |
3. Import Dashboard
The Import Dashboard is your command center. It displays key metrics and provides quick access to all import operations.
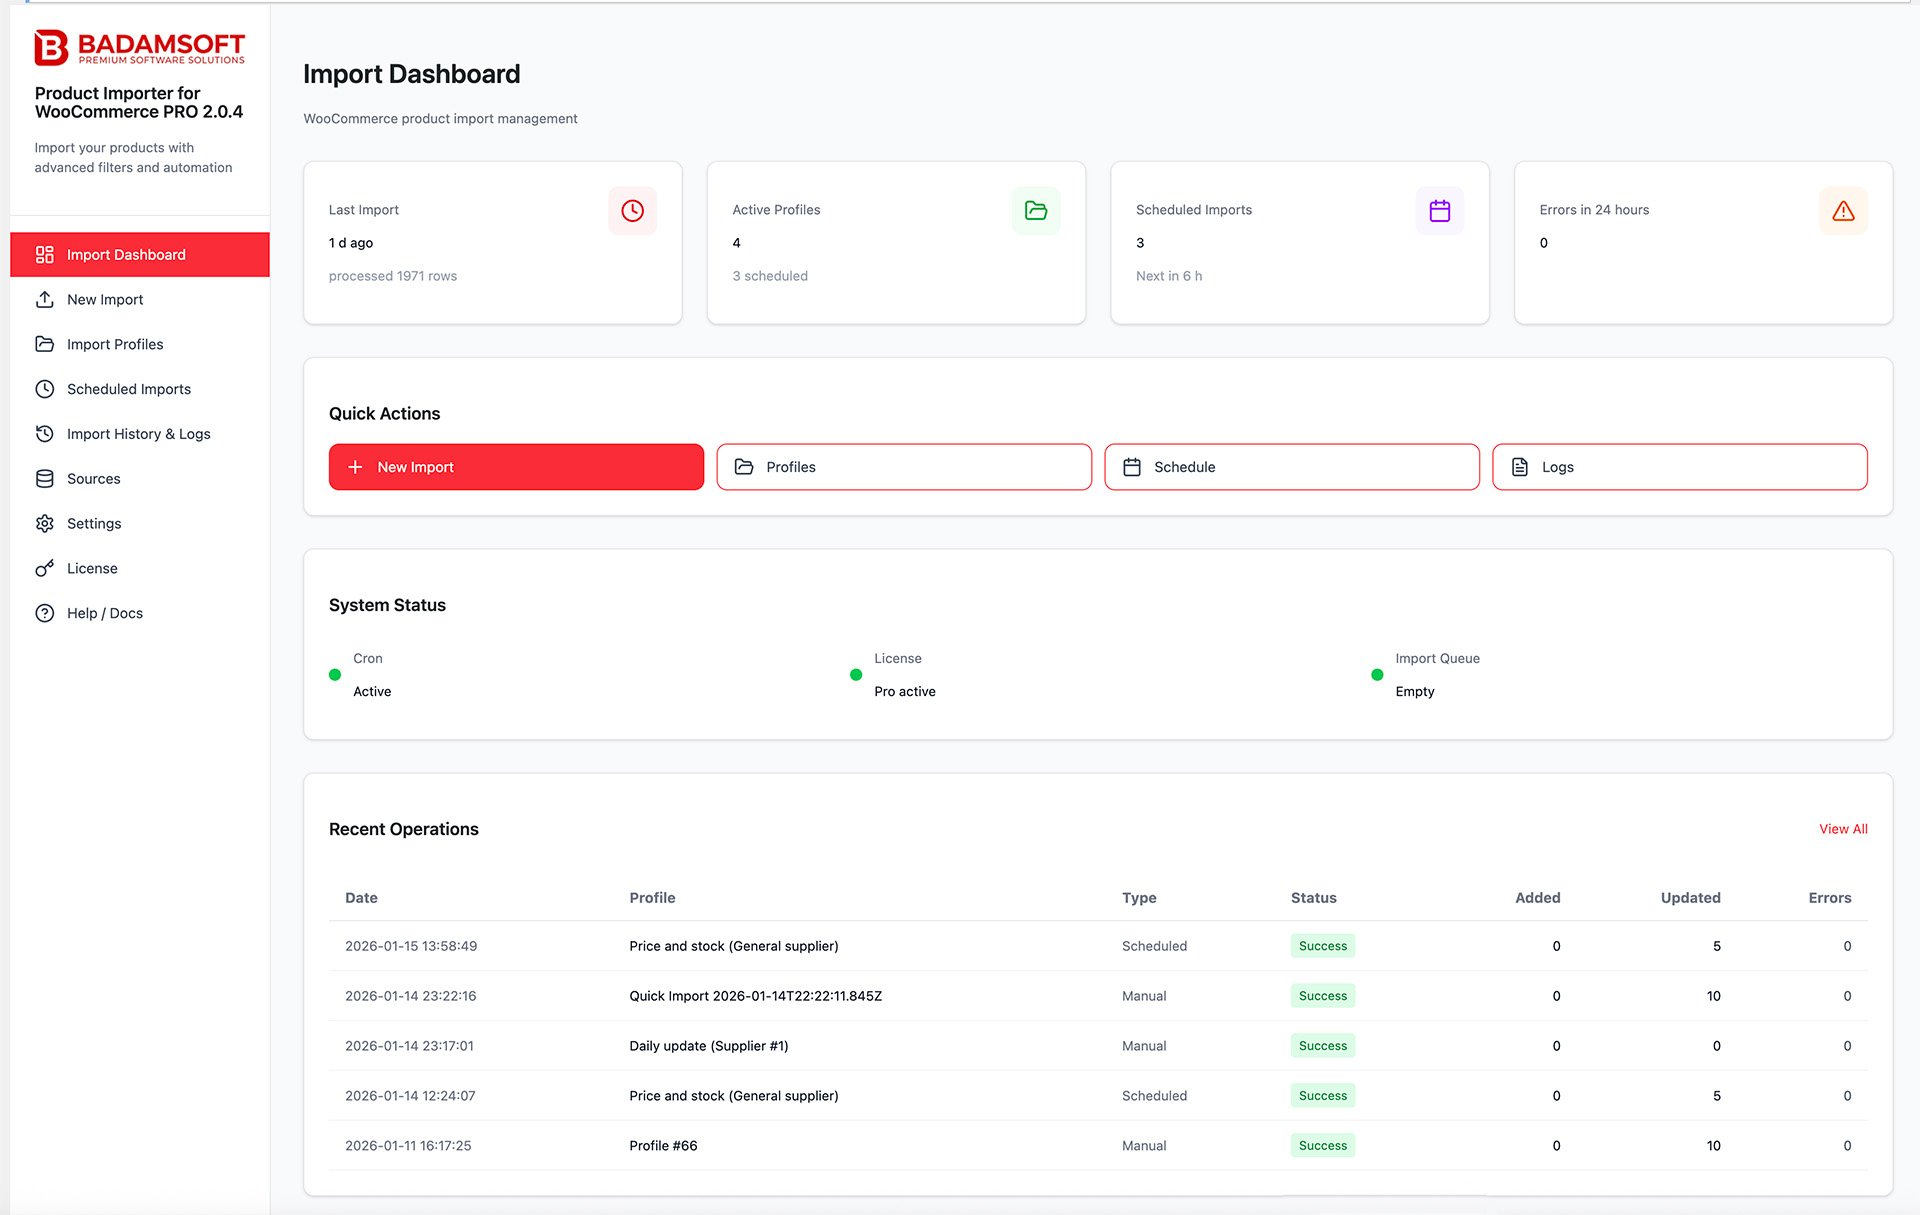
Dashboard Overview
Top Metrics Cards:
- Last Import: Shows time elapsed (e.g., "8 h ago") and rows imported (e.g., "Imported 1071 rows")
- Active Profiles: Number of saved import profiles (e.g., "3 Scheduled")
- Scheduled Imports: Count of active scheduled tasks with next run time (e.g., "2 Next in 17 h")
- Errors in 24 Hours: Failed imports in the last day (e.g., "0")
Quick Actions:
- New Import: Launch the 5-step import wizard
- Profiles: Manage saved import profiles
- Schedule: Configure scheduled imports (Pro)
- Logs: View import history and error logs
System Status:
- Cron: Active/Inactive status
- License: Pro active or Free version
- Import Queue: Empty or processing
Recent Operations Table:
Displays the most recent imports with columns:
- Date (e.g., "2026-01-14 15:32:47")
- Profile (e.g., "Price and stock (General supplier)")
- Type: Manual or Scheduled
- Status: Success, Partial Entry, or Failed
- Added/Updated/Errors counts
- Actions: View All button to see full history
4. New Import: 5-Step Wizard
The New Import wizard guides you through the complete import process in 5 logical steps. Each step must be completed before proceeding to the next.
Step 1: Data Source
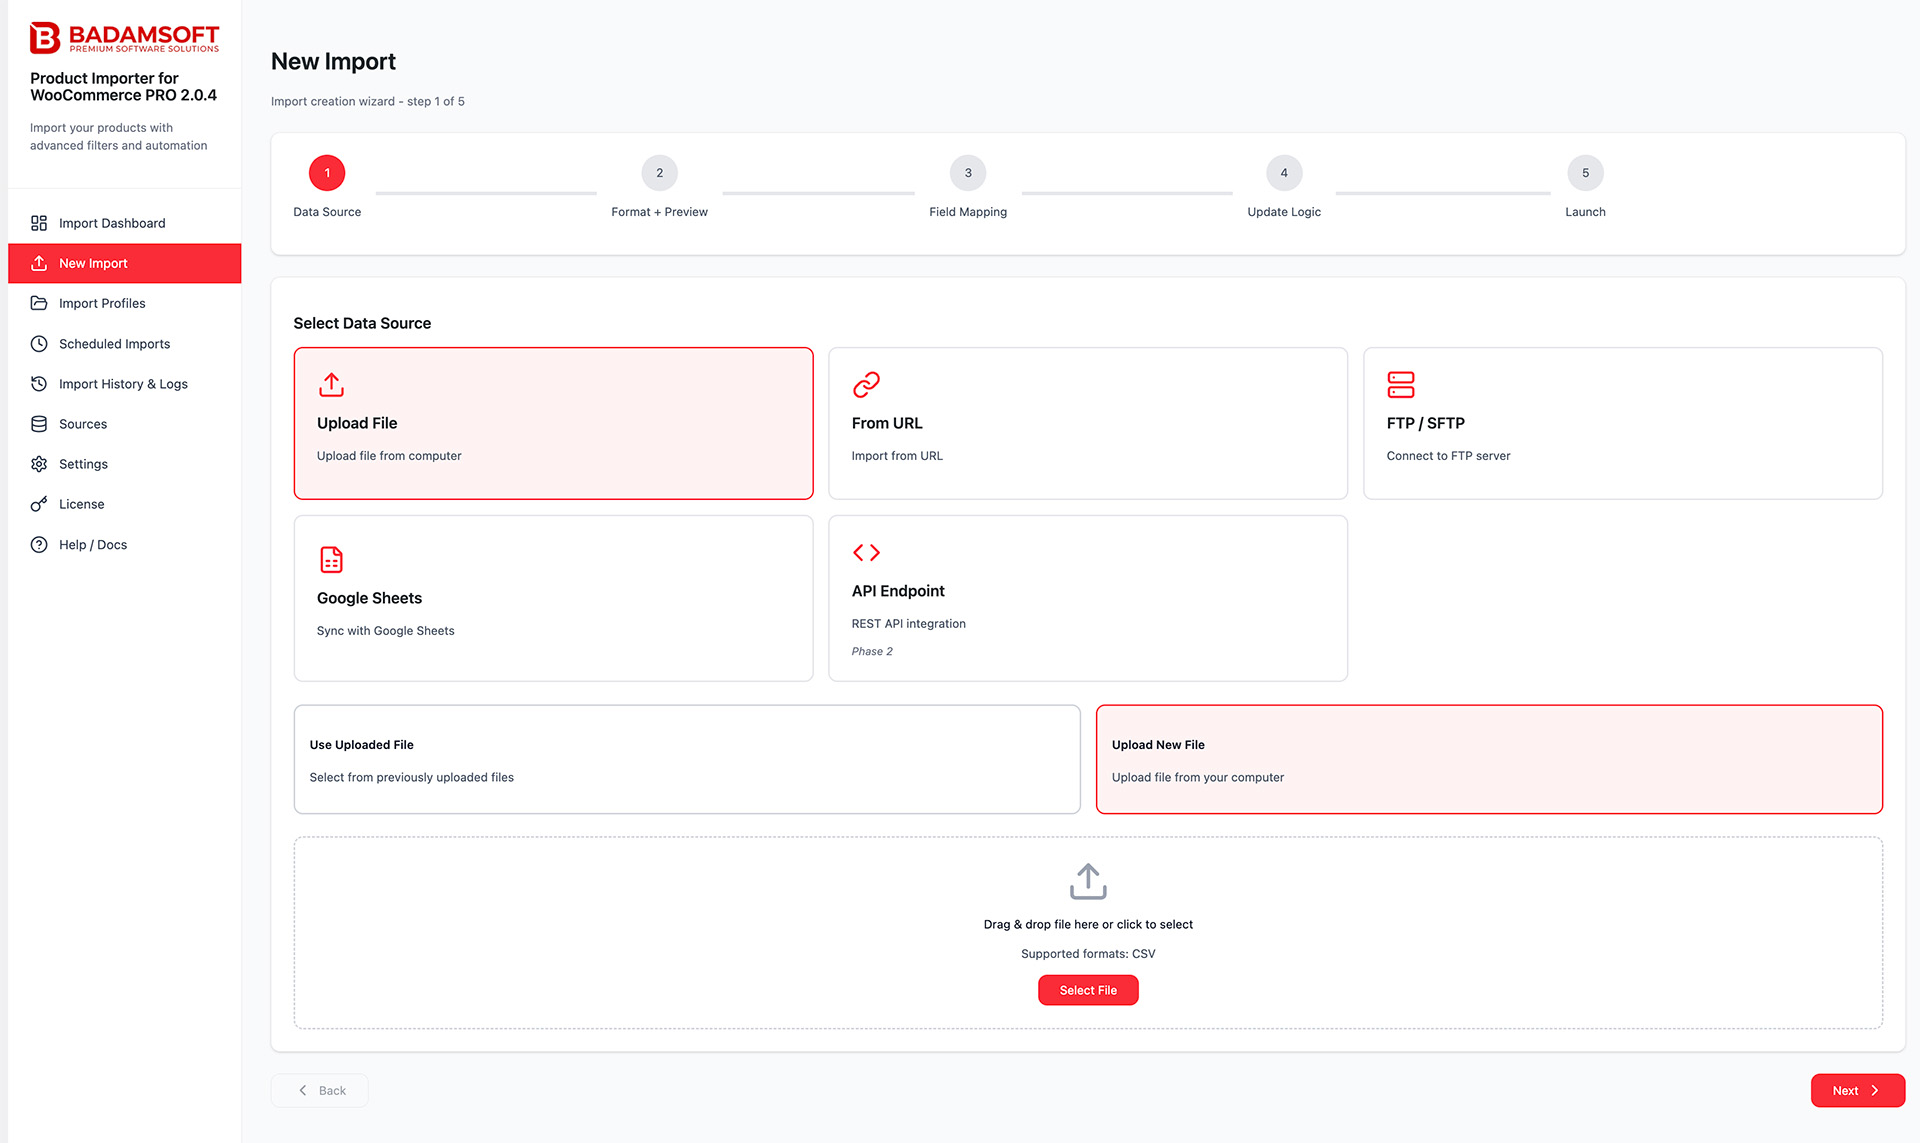
Main Purpose of Step
Tell the plugin where to get data for import.
Available Options (Free vs Pro)
| Source | Free | Pro | What to Specify | Recommendations / Common Errors |
|---|---|---|---|---|
| Local Upload | ✓ | ✓ | Upload file from computer | Simplest and most reliable option for beginners |
| URL feed | — | ✓ | Direct link to file | Make sure link returns exactly the file, not a page |
| FTP | — | ✓ | Host, port (usually 21), login, password, path to file | Use only if SFTP unavailable |
| SFTP (recommended) | — | ✓ | Host, port (usually 22), login, password/key, path | Most secure remote access option |
| Google Sheets | — | ✓ | Spreadsheet link + OAuth keys (Client ID/Secret) | Better to create separate sheet just for import |
| API / Remote endpoint | — | ✓ | Endpoint URL, authorization headers, method, etc. | Depends on specific plugin implementation |
Useful Tips for Step 1
- File names — try to make them unique (date + time in name helps a lot with debugging)
- Very large files (>50–100 MB) better to upload via FTP/SFTP or keep on stable hosting and import by URL
Common Beginner Mistakes
- Most common mistake for beginners — trying to paste a link like https://example.com/products.xlsx in Local Upload field
- Pro features blocked → large banner appears with offer to buy Pro
Select where your product data is coming from. The plugin supports multiple data sources:
Upload File
Upload CSV file from your computer. Drag & drop or click to select. Supported formats: CSV (free), CSV, XLSX, XML, JSON (pro).
From URL
Import from URL. Paste the direct link to your CSV/XLSX/XML/JSON file.
FTP / SFTP
Connect to FTP or SFTP server. Configure connection settings and select the file to import.
Google Sheets
Sync with Google Sheets. Authenticate with your Google account and select the spreadsheet.
API Endpoint
REST API integration. Enter API endpoint URL, authentication headers, and request parameters.
Step 2: Format + Preview
Main Purpose
Make sure the plugin correctly understood the structure and content of your file.
Format Selection
| Format | Free | Pro | Notes |
|---|---|---|---|
| CSV | ✓ | ✓ | Most universal and reliable option |
| XML | — | ✓ | Need to specify XPath to product element |
| JSON | — | ✓ | Need to specify path to product array (items path) |
| Excel (.xlsx, .xls) | — | ✓ | Supported from version ~2.0.0+; be careful with number formatting |
What to Check in Preview
- Are headers correctly identified (first row)
- Are data samples visible in rows (minimum 3–5 rows)
- No column shifts (very common problem with CSV)
- No mojibake instead of Russian/special characters
- For XML/JSON — correctly selected path to individual records
Common Settings and Their Impact
| Parameter | Where Located | Impact |
|---|---|---|
| Encoding | Settings / Auto-detect | Windows-1251, UTF-8 w/o BOM — most common cause of mojibake |
| Delimiter | Settings / Auto-detect | Comma, comma with tab, tab — second most common cause of shift |
| XPath (XML) | Field on this step | Incorrect path → empty preview |
| Items path (JSON) | Field on this step | Incorrect path → empty preview |
Typical Problems and Quick Solutions
| Problem | Most Likely Cause | What to Do |
|---|---|---|
| Headers exist, data empty | Incorrect XPath / items path | Clarify correct path in file |
| Strange characters in SKU/names | Incorrect encoding | Try changing encoding in settings |
| Columns shifted | Different delimiter in file | Specify correct delimiter manually |
| "Unsupported format" | Trying to open XML/JSON/XLSX in free version | Need Pro version |
Step 3: Field Mapping

What is Field Mapping and Why It's Needed
Field Mapping is the key part of the import wizard where you specify which column of your file corresponds to which product field in WooCommerce.
The correctness of this step determines 80–90% of import success: correct names, prices, stock, categories, images, attributes, and variations.
Main Interface Feature — Maximum Proximity to WooCommerce Product Card
Developers deliberately made the field mapping interface as similar as possible to the standard WooCommerce product editing card.
This means:
- Same field grouping logic by blocks/tabs
- Practically the same field names
- Familiar layout of main sections (General → Prices → Stock → Shipping → Attributes → Variations → Images)
- Same visual accents on required fields
- Similar behavior when working with attributes and variations
For most WooCommerce users, this significantly lowers the entry barrier — they immediately understand where and what to map, without needing to learn completely new logic.
Important Interface Elements
| Element | Where Located | What It's For / Tip |
|---|---|---|
| Product type selector | Very top | Free → only Simple. Pro → Simple/Variable/Grouped |
| Left panel (Source Fields) | Left | Your columns + sample values from selected row |
| Right panel (Target Fields) | Right, tabs | WooCommerce fields, grouped by meaning |
| Preview row switcher | Above left panel | Very useful if current row has many empty values |
| Tokens {ColumnName} | Entered automatically when dragging | Allow combining values |
Main Tabs and Most Important Fields (2025–2026)
| Tab | Most Important Fields (required highlighted) | Notes |
|---|---|---|
| General | Product name, Description, Short description | Name almost always required |
| Pricing | Regular price, Sale price | Many stores require at least regular price |
| Inventory | SKU, GTIN/EAN/UPC/ISBN, Stock quantity, Stock management | SKU — key identifier in 90% of cases |
| Taxonomy | Categories (multi-level), Tags, Brand (if such taxonomy exists) | Often make mistakes with separators |
| Images | Main image, Gallery | Separators for gallery usually comma or pipe |
| Attributes | Attribute name, Values, Visible, Used for variations | Most complex and most important tab for variable products |
| Variations | (only when Variable selected) Variation SKU strategy, variation prices, etc. | Requires very precise matching |
| Grouped | (only when Grouped selected) Links to products in group | Rarely used |
Useful Mapping Techniques
| Action | How to Do | Example |
|---|---|---|
| Compound name | Manually write template | {Brand} {Model} ({Color}) |
| Multiple images in gallery | Specify column with separator | https://...1.jpg|https://...2.jpg |
| Multiple categories | Usually via comma or special level field | Clothing > T-shirts > Men's |
| Create attributes from one column | {Color} → separator or comma | Red|Blue|Green |
Convenient Import Creation for Variable and Grouped Products
The interface is specially optimized for working with Variable (variable) and Grouped (grouped) products — one of the strongest plugins in Pro version.
Variable Products (Variable Products)
Interface features that make work convenient:
- When selecting product type "Variable", the Variations tab automatically appears (as in parent WooCommerce dropdown)
- On Attributes tab, you can check "Used for variations" — immediately clear which attributes will generate variations
-
Plugin supports several popular variation creation strategies:
- ○ Variations from separate rows (classic approach "one row = one variation")
- ○ Variations by attribute combination from one parent product
- ○ Automatic parent product creation by common SKU/pattern
- Variation fields (price, SKU, stock, variation images) are displayed in familiar tabular form
Grouped Products (Grouped Products)
- When selecting type "Grouped", a special Grouped products block appears
-
Convenient mapping of child products:
- ○ By child product SKU
- ○ By SKU list in separate column (via separator)
- ○ By common group identifier
- Parent product fields (name, description, categories) are filled as usual
- Child products are automatically linked to group after import
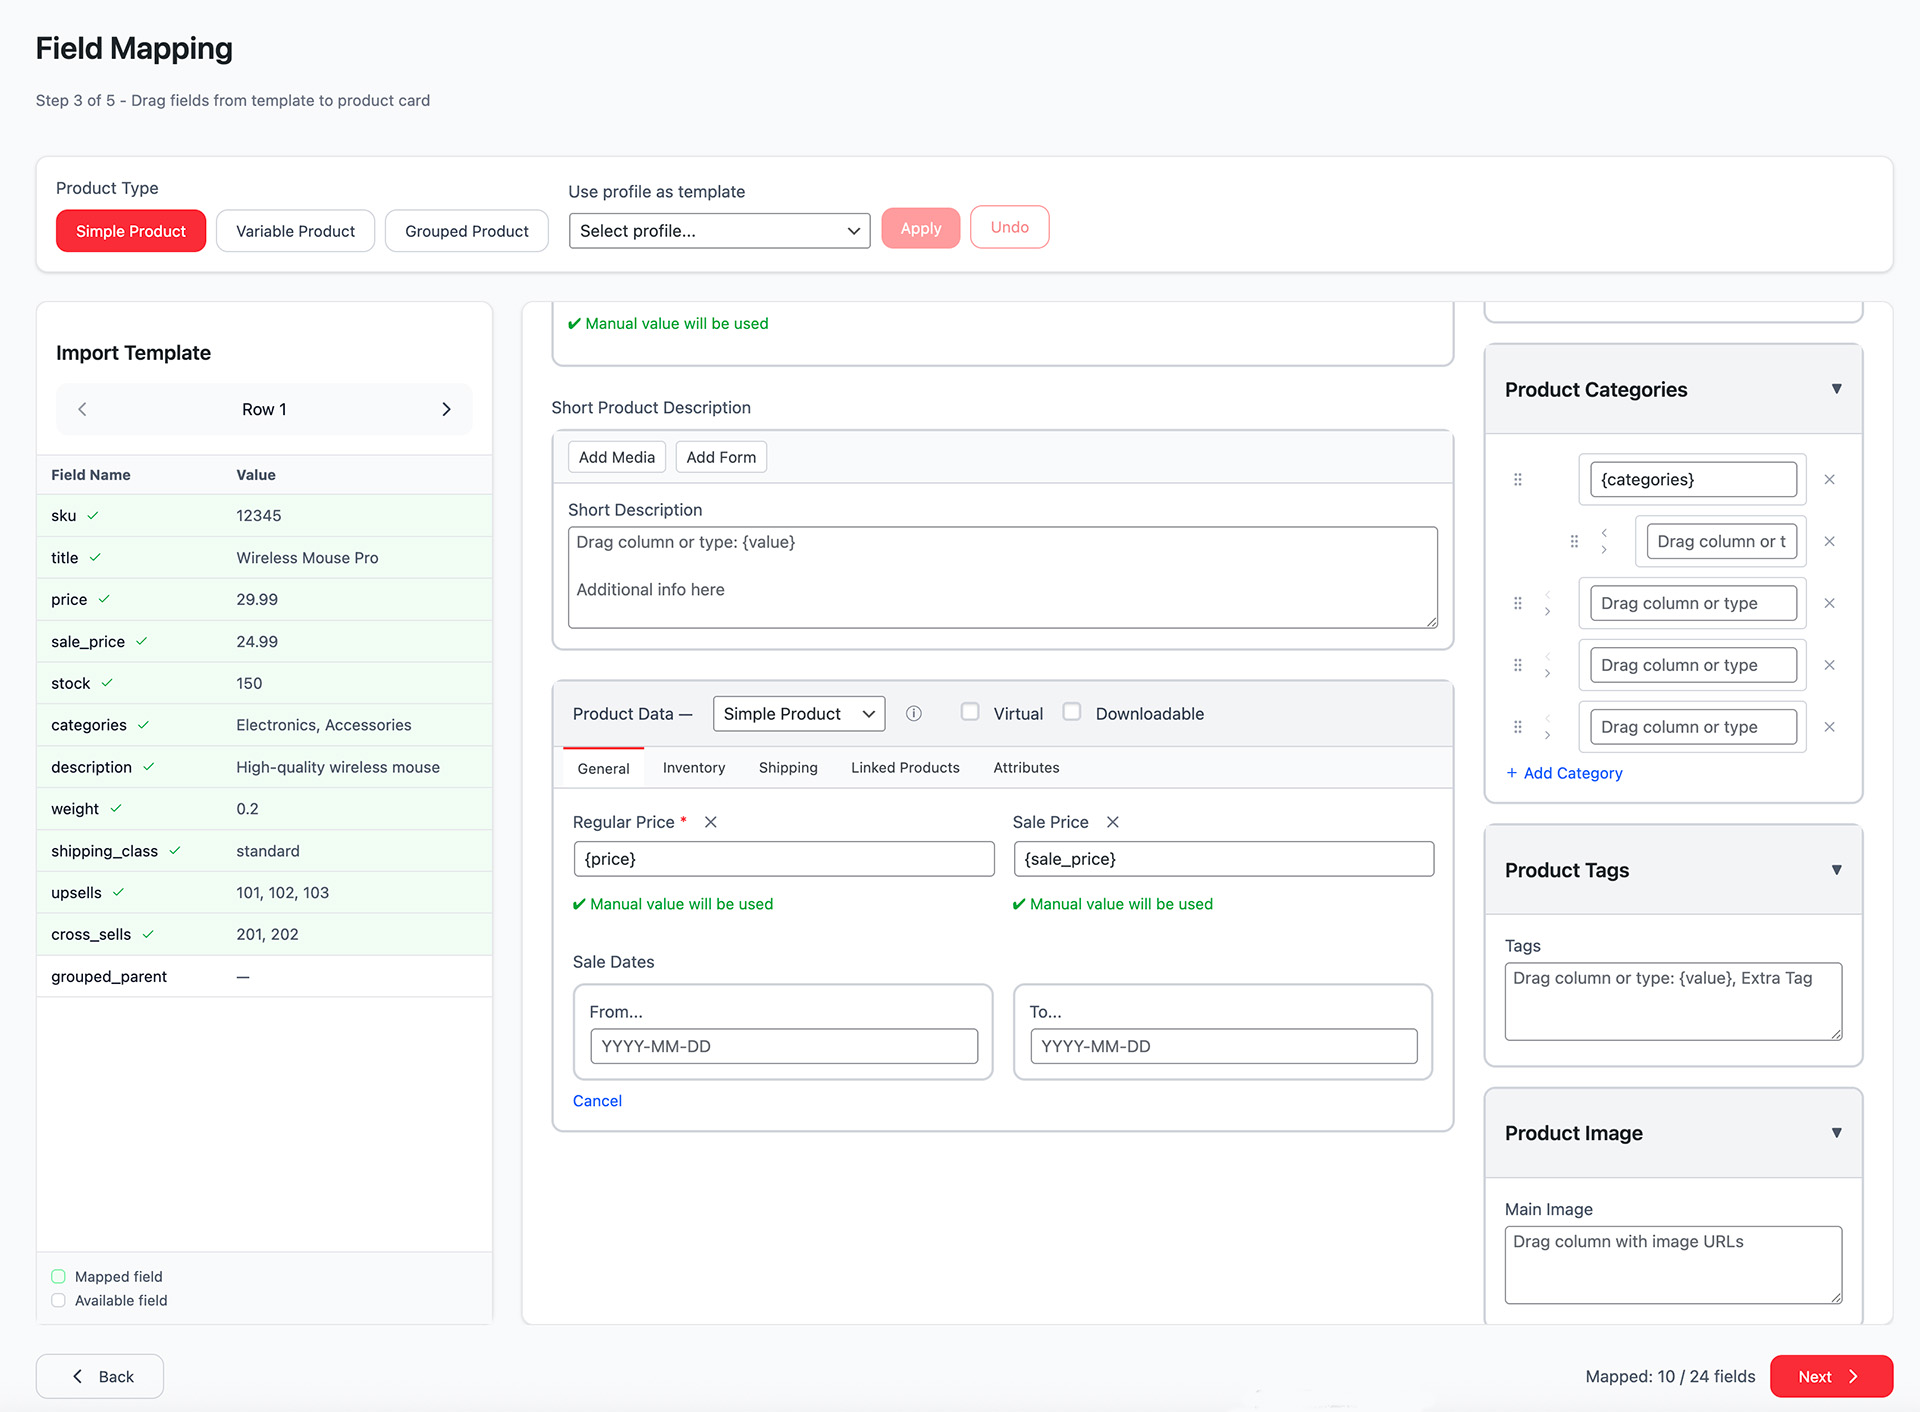
Map columns from your import file to WooCommerce product fields. This is the most critical step.
Product Type Selection:
- Simple Product: Standard products with no variations
- Variable Product: Products with variations (Pro only)
- Grouped Product: Collection of related products (Pro only)
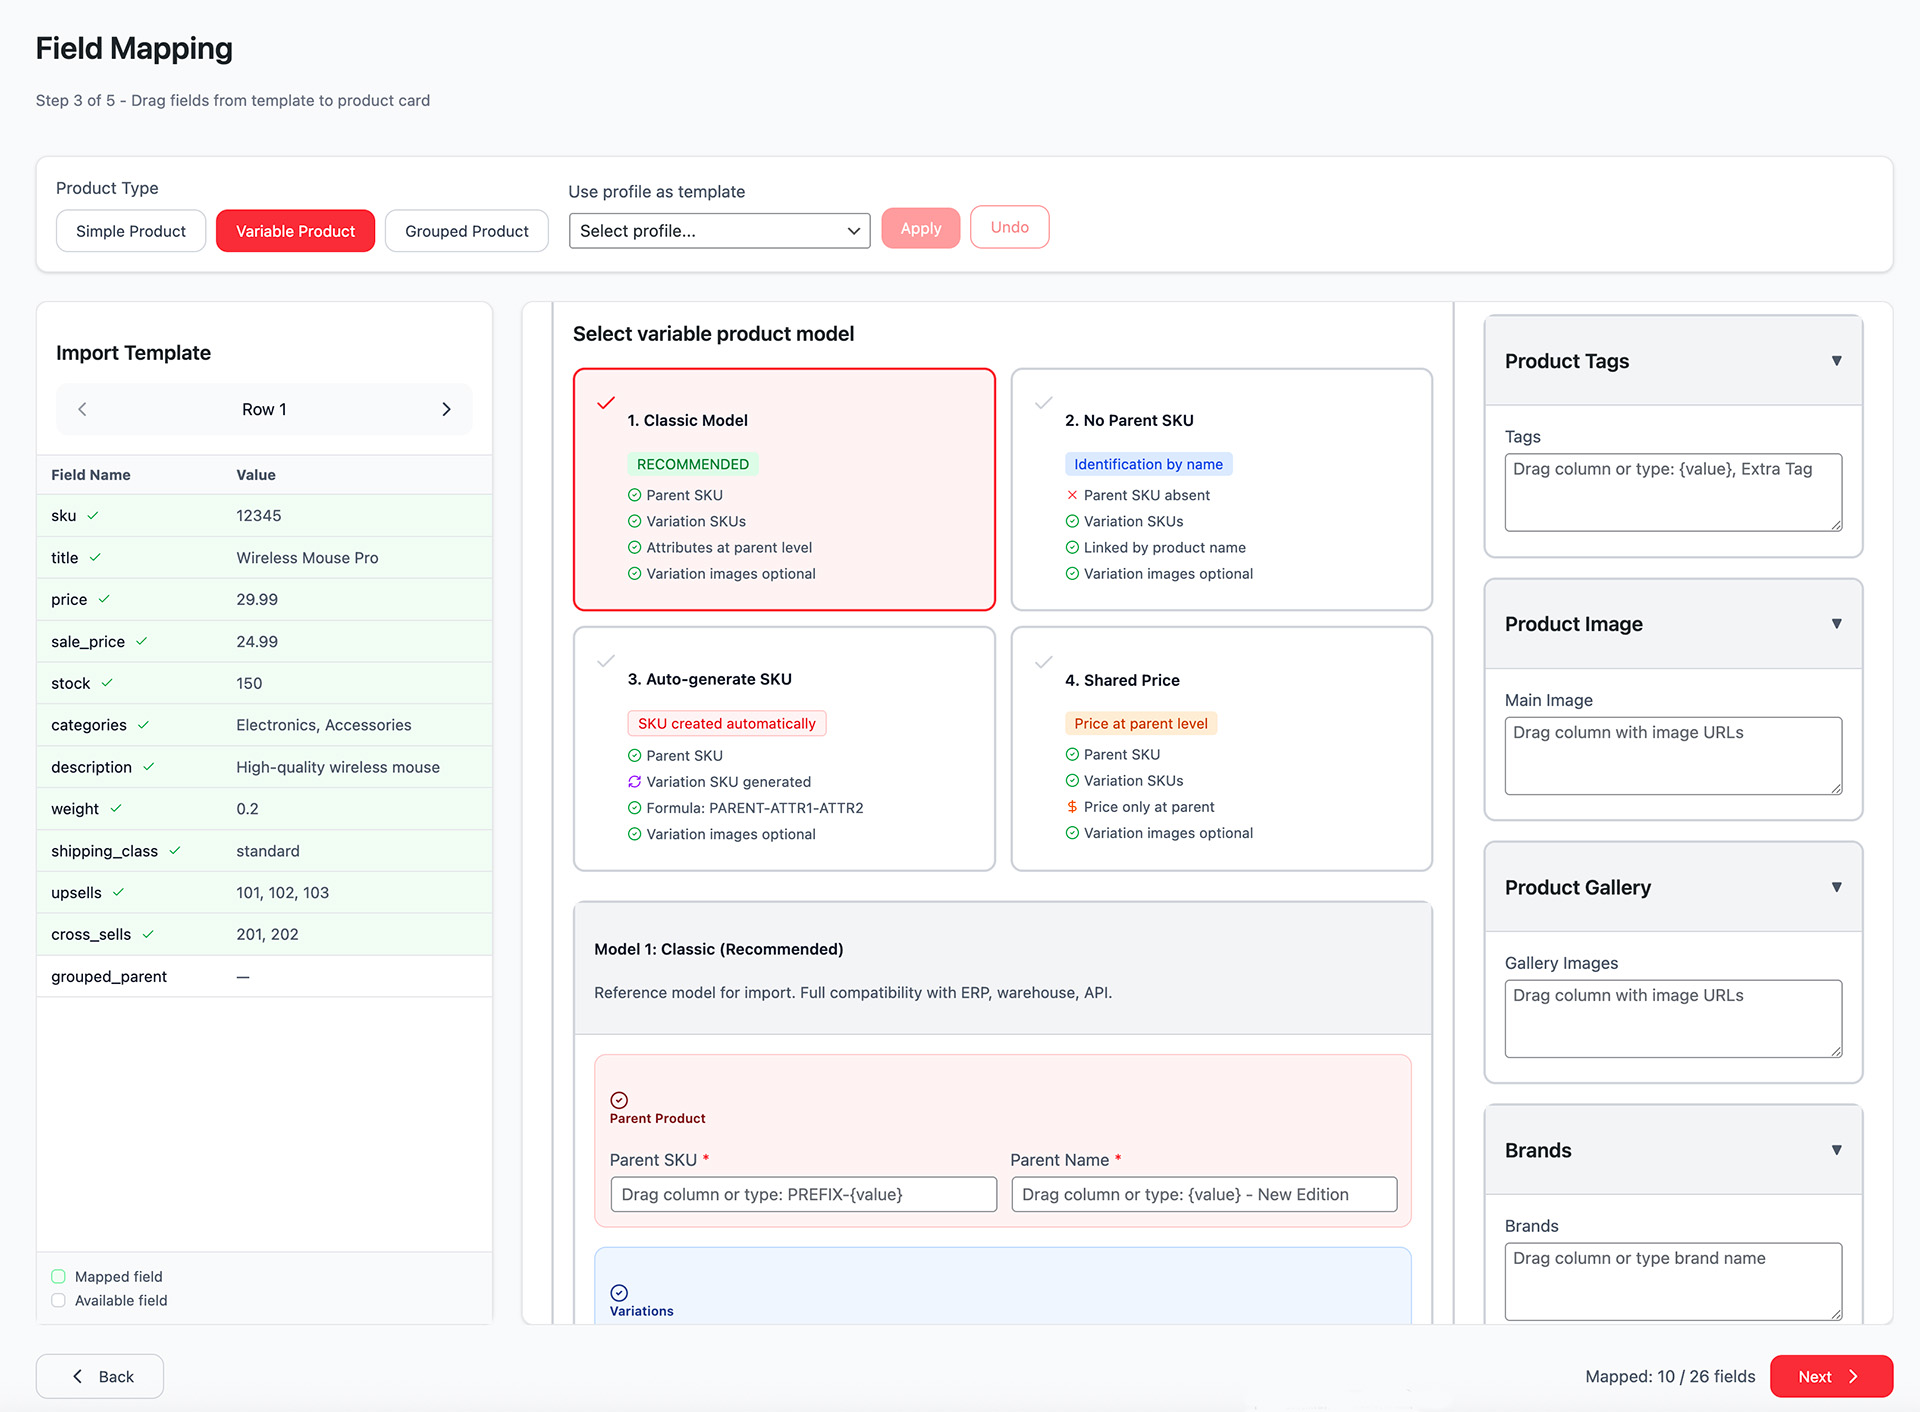
Variable Product: Select model (Classic, No Parent SKU, Auto-generate SKU, Shared Price)
Import Template (Left Panel):
Shows your import file columns with sample data. Navigate between rows using arrow buttons.
WooCommerce Product Card (Right Panel):
Visual product card with drag-and-drop zones:
- Product Title: Drag column or type value
- Product Description: Add Media / Add Form buttons
- Product Data: General (Price), Inventory (SKU, Stock), Shipping, Attributes
-
Product Categories:

Drag columns to create category structure. Use indentation to create category hierarchy:
- • Indented fields create subcategories (e.g., Category-1 > Category-2 > Cat-3)
- • Fields at the same level are equal categories (e.g., Category-1 and Category-4)
- • Move fields left/right by clicking "<" or ">" to adjust hierarchy level
- Product Tags: Drag columns for taxonomies
- Product Image: Drag column with image URLs
Mapping Indicators:
- ✓ Mapped field
- ✓ Manual value will be used
Progress Counter: Bottom right shows "Mapped: 10 / 24 fields". Minimum required: SKU or Title.
Useful Techniques to Speed Up Work
- For compound names: {Brand} {Model} - {Color} ({Size})
- Category hierarchy: slide fields right to create nesting
- Image gallery: drag "image_url" or similar (check in preview)
- Variations: first map attributes and check "Used for variations", then move to prices/stock of variations
- Save successful mappings in separate Profiles — especially useful for variable products
Quick Checklist Before Moving to Next Step
- ☐ Correct product type selected (Simple / Variable / Grouped)
- ☐ Name and SKU mapped (required for all types)
- ☐ Price specified (regular_price)
- ☐ For variable products, attributes checked "Used for variations"
- ☐ For grouped products, child products correctly mapped
- ☐ Category hierarchy built correctly (check shifts)
- ☐ Images look correct in preview
- ☐ All required fields filled (check statistics)
- ☐ Reviewed 3–5 different preview rows
The interface is as close as possible to the familiar WooCommerce product card — so most experienced users start working confidently with mapping from the first time.
Step 4: Update Logic
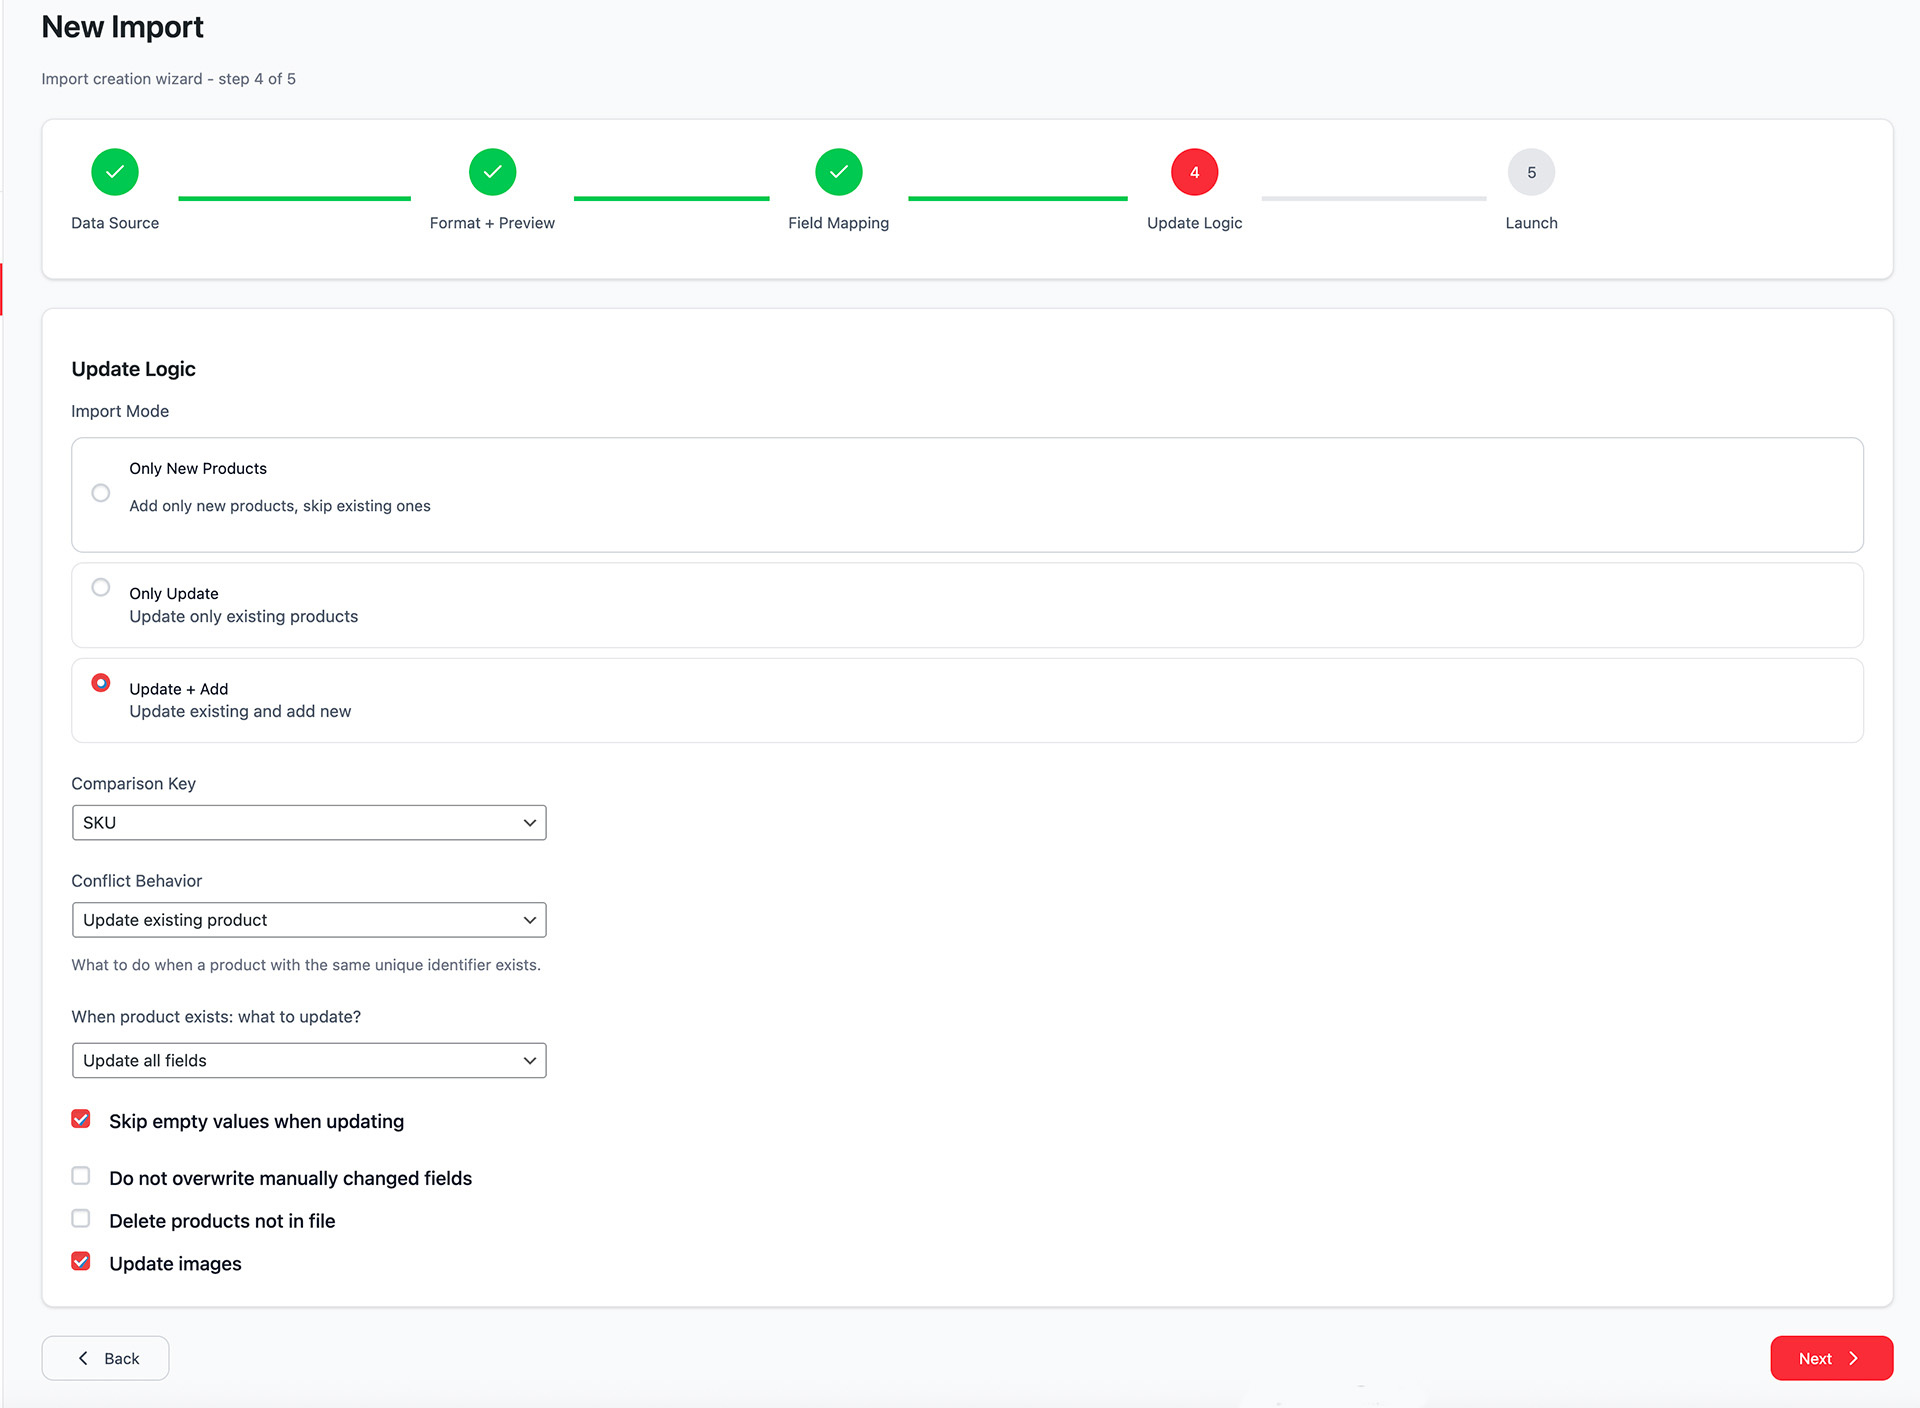
Most Important Decisions on This Step
| Parameter | Most Popular Options | When to Use |
|---|---|---|
| Matching key | SKU (almost always) | Most reliable and recommended option |
| What to do when product found | Update / Skip / Create duplicate | 90% of cases → Update |
| What to do on row error | Continue and log error / Stop | Almost always → Continue and log |
| Update images | Always / Only if empty / Never | For daily updates more often Never or Only if empty |
| New product status | Publish / Draft | For safety often choose Draft |
| Update only drafts | Yes / No | Useful protective function when working with live store |
Most Dangerous Combinations (Better to Avoid)
- Matching key = Product ID + "Create duplicate" → almost guaranteed duplicates
- "Update only drafts" + all products already published → nothing will update
- "Update images always" + daily import 5000+ products → huge load and timeouts
Step 5: Launch
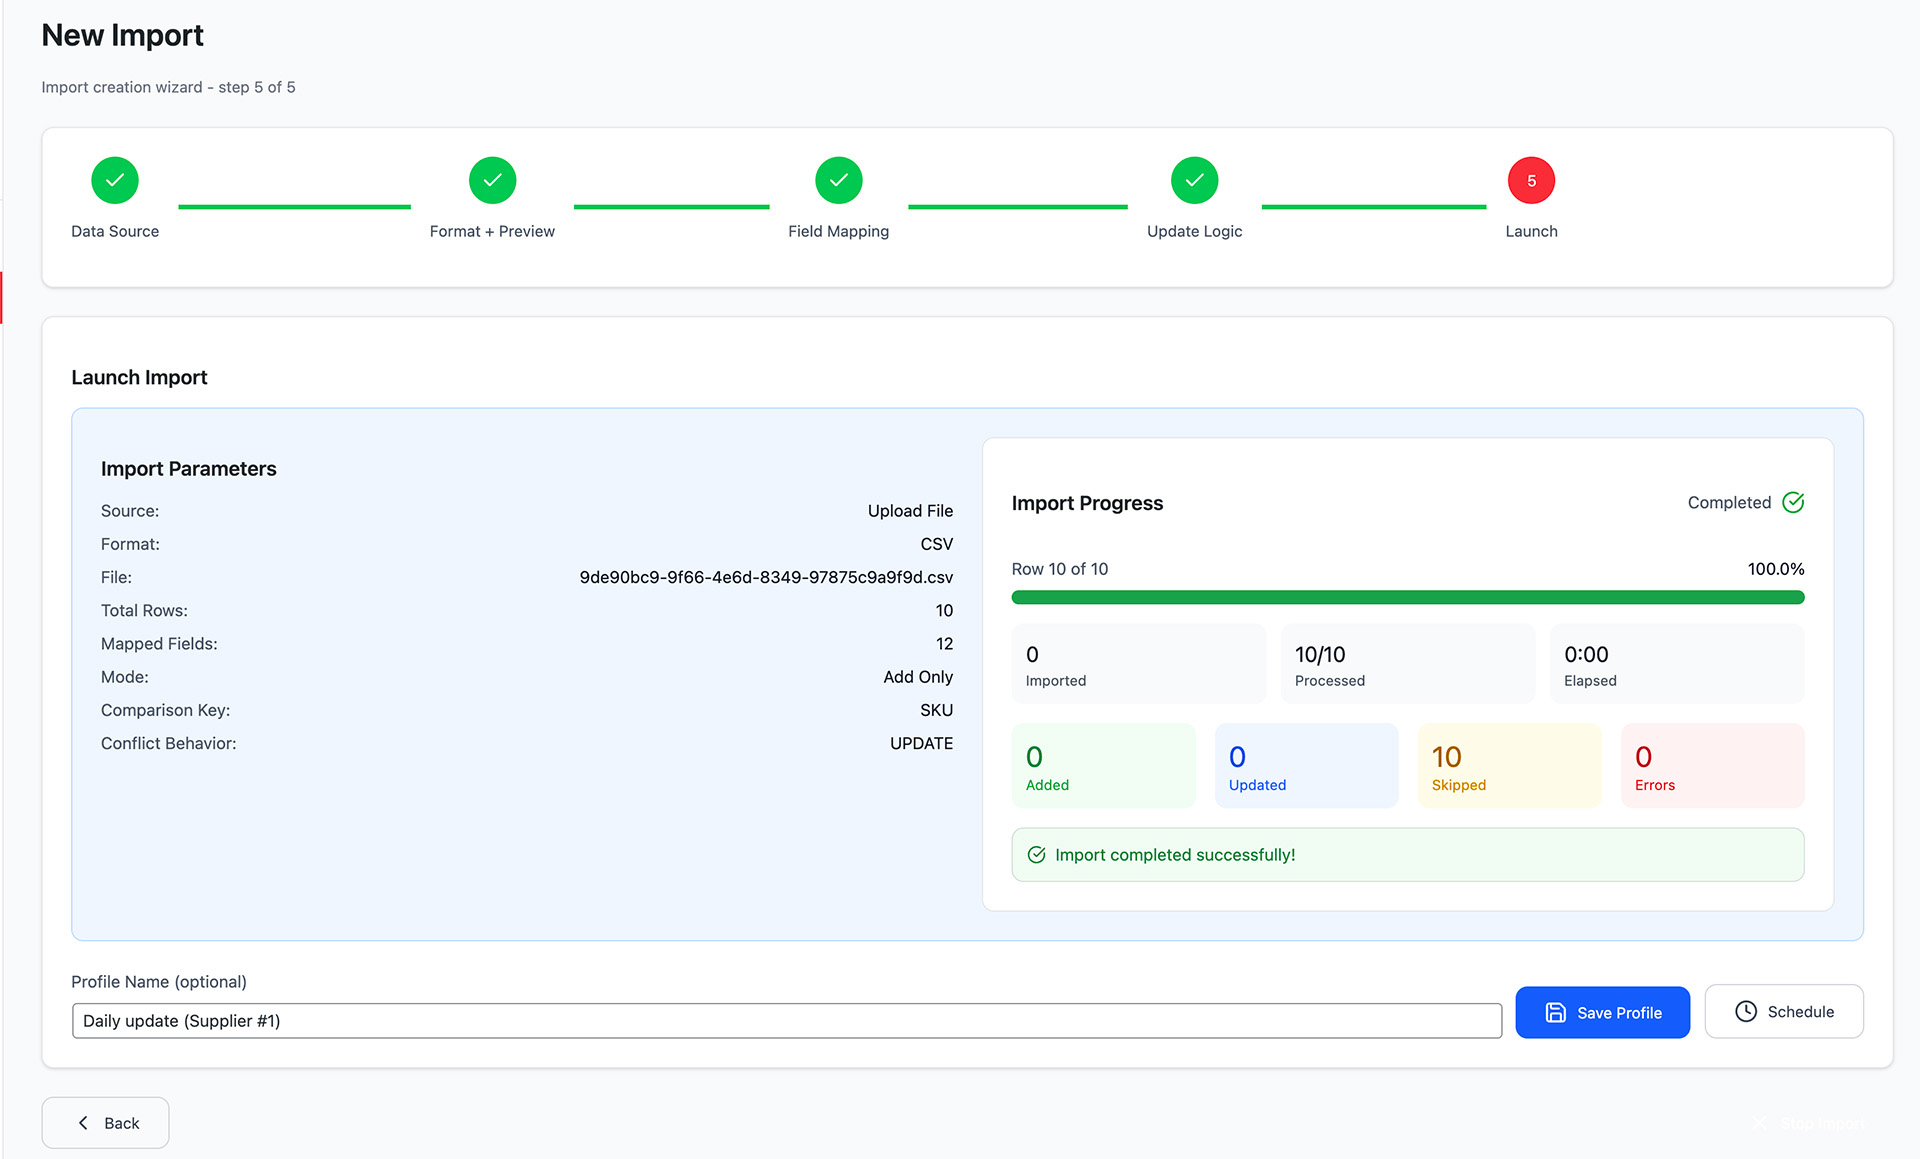
What to Check Before Clicking "Start"
- ✓ Correct source selected
- ✓ Format and preview look correct
- ✓ All required fields (name, SKU, price) filled/mapped
- ✓ Adequate matching key selected
- ✓ Update logic matches your goals (add/update/update only)
What Happens After Launch
- Progress bar appears (in real-time via SSE, if server supports)
- Current counters shown: processed / added / updated / skipped / errors
- "Stop Import" button (if import is long)
- Upon completion — offer to save as profile (highly recommended!)
- Pro version → can additionally schedule import immediately
Recommended Action Sequence After First Successful Import
- Save as profile with descriptive name
- Do small test run of this profile (Run button)
- Verify everything works as expected
- Only after this plan regular launch (Pro) or use Run button manually
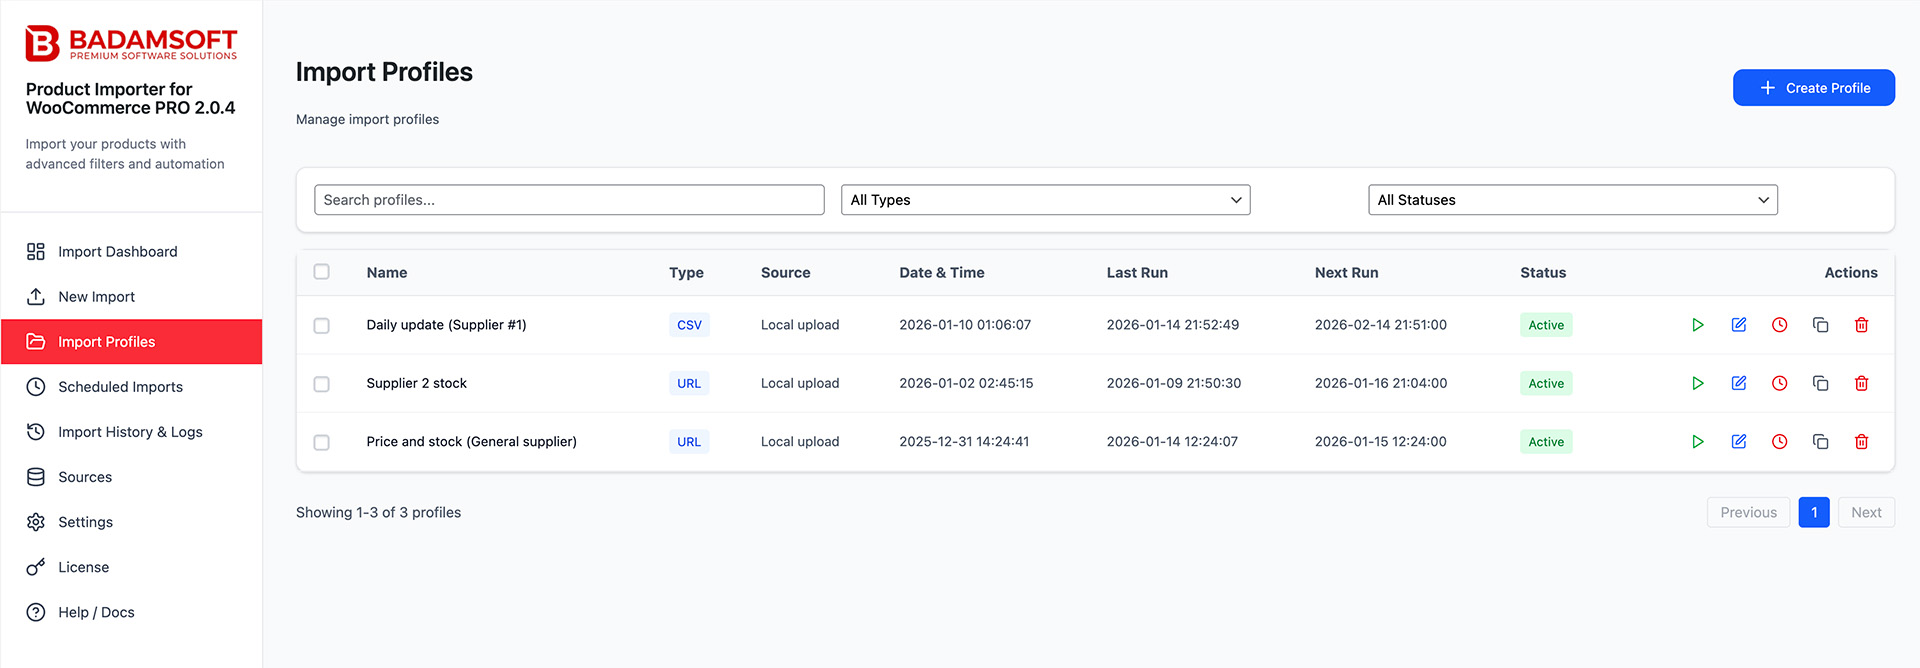
5. Import Profiles
Import Profiles allow you to save and reuse import configurations. This saves time when importing similar data repeatedly.
Save 1 import profile with all field mappings, data source, and update logic settings.
Unlimited profiles. Each profile card shows: name, data source type, last run date, and quick actions (Run, Edit, Delete).
Profile Actions:
- Run: Execute import immediately with saved settings
- Edit: Modify field mappings or update logic
- Schedule: Create a run schedule for this profile (Pro)
- Duplicate: Create a copy to use as template (Pro)
- Delete: Remove profile permanently
6. Scheduled Imports (Pro Only)
ProAutomate recurring imports with flexible scheduling options. Perfect for daily price updates, inventory sync, or supplier feeds. Without proper configuration, achieving stable and reliable automatic product synchronization (prices, stock, new arrivals, etc.) is nearly impossible.
What Free Users See
When navigating to Scheduled Imports, free users see a large banner promoting Pro with the following benefits:
- Scheduled imports
- Remote sources (URL, FTP, SFTP, Google Sheets)
- Email notifications
- Planning calendar
- Cron expression support
- "Upgrade to PRO" button
Pro Page Structure
The page consists of several key functional blocks:
| Block | Location | Purpose | Importance |
|---|---|---|---|
| Secure Cron URL | Top of page | Main element for reliable scheduling | ★★★★★ |
| Tabs (List / Calendar) | Below header | Switch between schedule list and visual calendar | ★★★★ |
| Filters and create button | Above table | Search, filter by status (Active/Paused), "Create Schedule" button | ★★★ |
| Schedule table | Main area | List of all created schedules with key parameters and actions | ★★★★ |
| Calendar (Calendar tab) | Second tab | Visual representation — which days of the month have scheduled tasks | ★★ |
Schedule List — Table Columns
| Field | What It Shows | Usefulness |
|---|---|---|
| Profile | Which saved import profile will be executed | ★★★★★ |
| Schedule Name | Human-readable schedule name | ★★★ |
| Frequency | Daily / Weekly / Monthly / Cron | ★★★ |
| Time(s) | How many times to run (can be multiple times per day) | ★★★ |
| Status | Active / Paused | ★★★★★ |
| Date Range | Schedule validity period (if set) | ★★ |
| Last Run | When last successfully completed | ★★★★ |
| Next Run | When next scheduled | ★★★★★ |
| Actions | Run now / Edit / Pause/Resume / Delete | ★★★★ |
Common Actions in Table
| Action | When to Use | Key Moment |
|---|---|---|
| Run now | Want to test schedule immediately | Does not change schedule status |
| Pause | Temporarily stop (e.g., during sale) | Saves all settings |
| Resume | Resume after pause | |
| Delete | Remove schedule permanently | Import profile remains |
Schedule Calendar — Visual Planning
- Monthly calendar
- Days with scheduled imports are highlighted
- Click on a day → shows list of tasks for that day (in modal window)
Useful for:
- Understanding overall server load
- Planning large catalog updates
- Avoiding multiple heavy imports on the same day
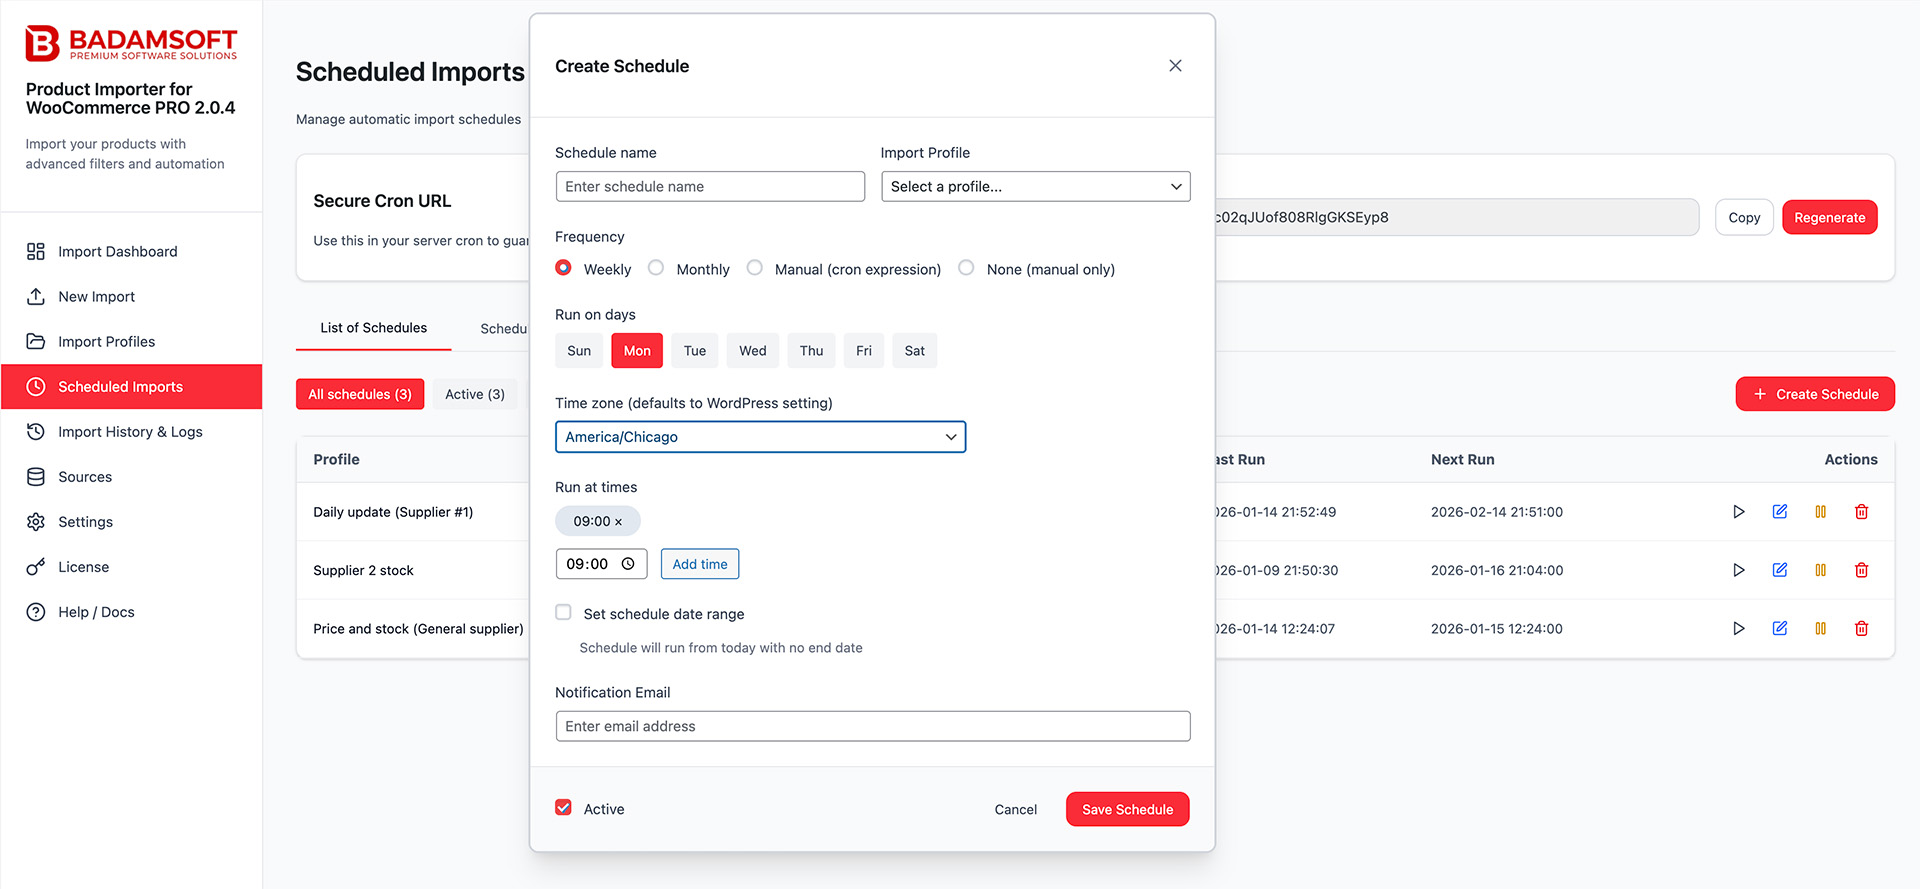
Create / Edit Schedule (Modal Window)
Key fields (in order of importance):
| Field | Typical Values | Required? | Recommendation |
|---|---|---|---|
| Profile | Select from existing profiles | Yes | |
| Schedule Name | e.g., "Daily stock update 03:15" | Yes | Descriptive name |
| Enabled | On / Off | Yes | |
| Frequency | Daily / Weekly / Monthly / Custom Cron | Yes | |
| Run time(s) | 03:15, 15:00 (can be multiple) | Daily | Choose nighttime |
| Days of week | Mon-Sun (for Weekly) | Weekly | |
| Day of month | 1-31 (for Monthly) | Monthly | |
| Cron expression | */15 * * * * (every 15 minutes) | Custom | For experienced users only |
| Timezone | Europe/Podgorica, Europe/Moscow, etc. | Yes | Very important! |
| Date range | from ... to ... | No | For promotions/seasonal |
| Notification email | email@your-store.com | No | Highly recommended |
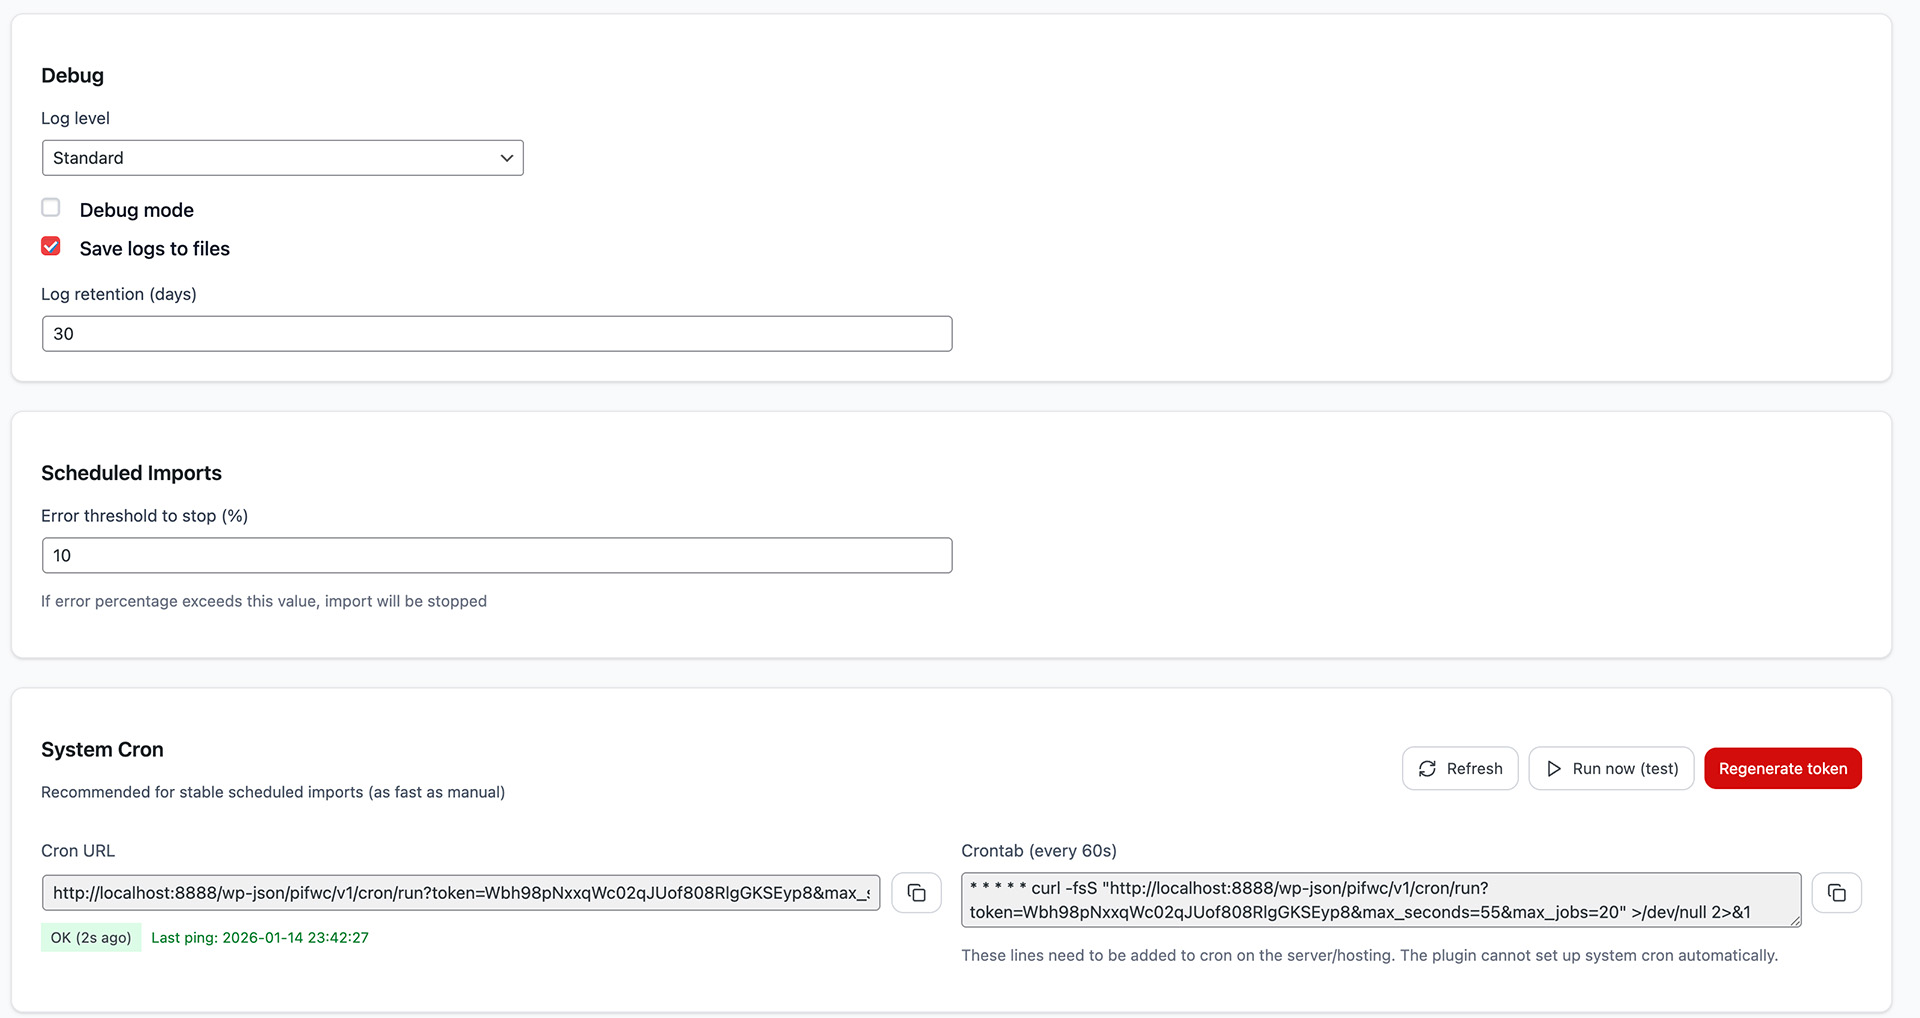
Secure Cron URL Block — The Most Important Element
What is it:
A special protected URL like:
The hosting server must periodically (recommended every 1-5 minutes) access this URL to check and run all active schedules.
Buttons Next to URL
- Copy → copy to clipboard
- Regenerate → completely new token (old one stops working immediately!)
Important Token Rules
| Action | Consequences | Recommendation |
|---|---|---|
| Generated new token | All old crontab links become useless | Must update links |
| Copied but not added to cron | Schedules never run automatically | Most common mistake |
| Hosting blocks outgoing requests | Even correct crontab won't work | Check with hosting |
| Added to WP-Cron instead of server | Very large delays and unreliability | Not recommended |
Recommended Crontab Line (Most Popular)
Bash:
or more modern with curl:
Note: For detailed cron setup instructions, see the Settings section.
Typical Workflow for Creating a Reliable Schedule
- Create and thoroughly test profile in New Import → Save as Profile
- (If remote source) → create and test Source in Sources section
- Go to Scheduled Imports → Create Schedule
- Select profile, give descriptive name
- Set nighttime (02:00–05:00)
- Enable email notifications
- Save
- Copy Secure Cron URL
- Add to server crontab (every 1–5 minutes)
- Wait 5–10 minutes → check "Next Run" and status in table
- Next morning check email and Import History
Common Problems & Quick Solutions
| Problem | Most Likely Cause | Where to Look / What to Do |
|---|---|---|
| Schedule is on but never runs | No server cron or incorrect token | Settings → System Cron + crontab |
| Next Run not updating | Cron not running / token expired | Regenerate token → update crontab |
| Import runs but with huge delay | Using WP-Cron instead of server | Switch to server cron |
| Too many errors → import stops | Too strict error threshold in settings | Settings → Scheduled Imports → Error threshold |
7. Import History & Logs
Track all import operations with detailed logs and error reports.
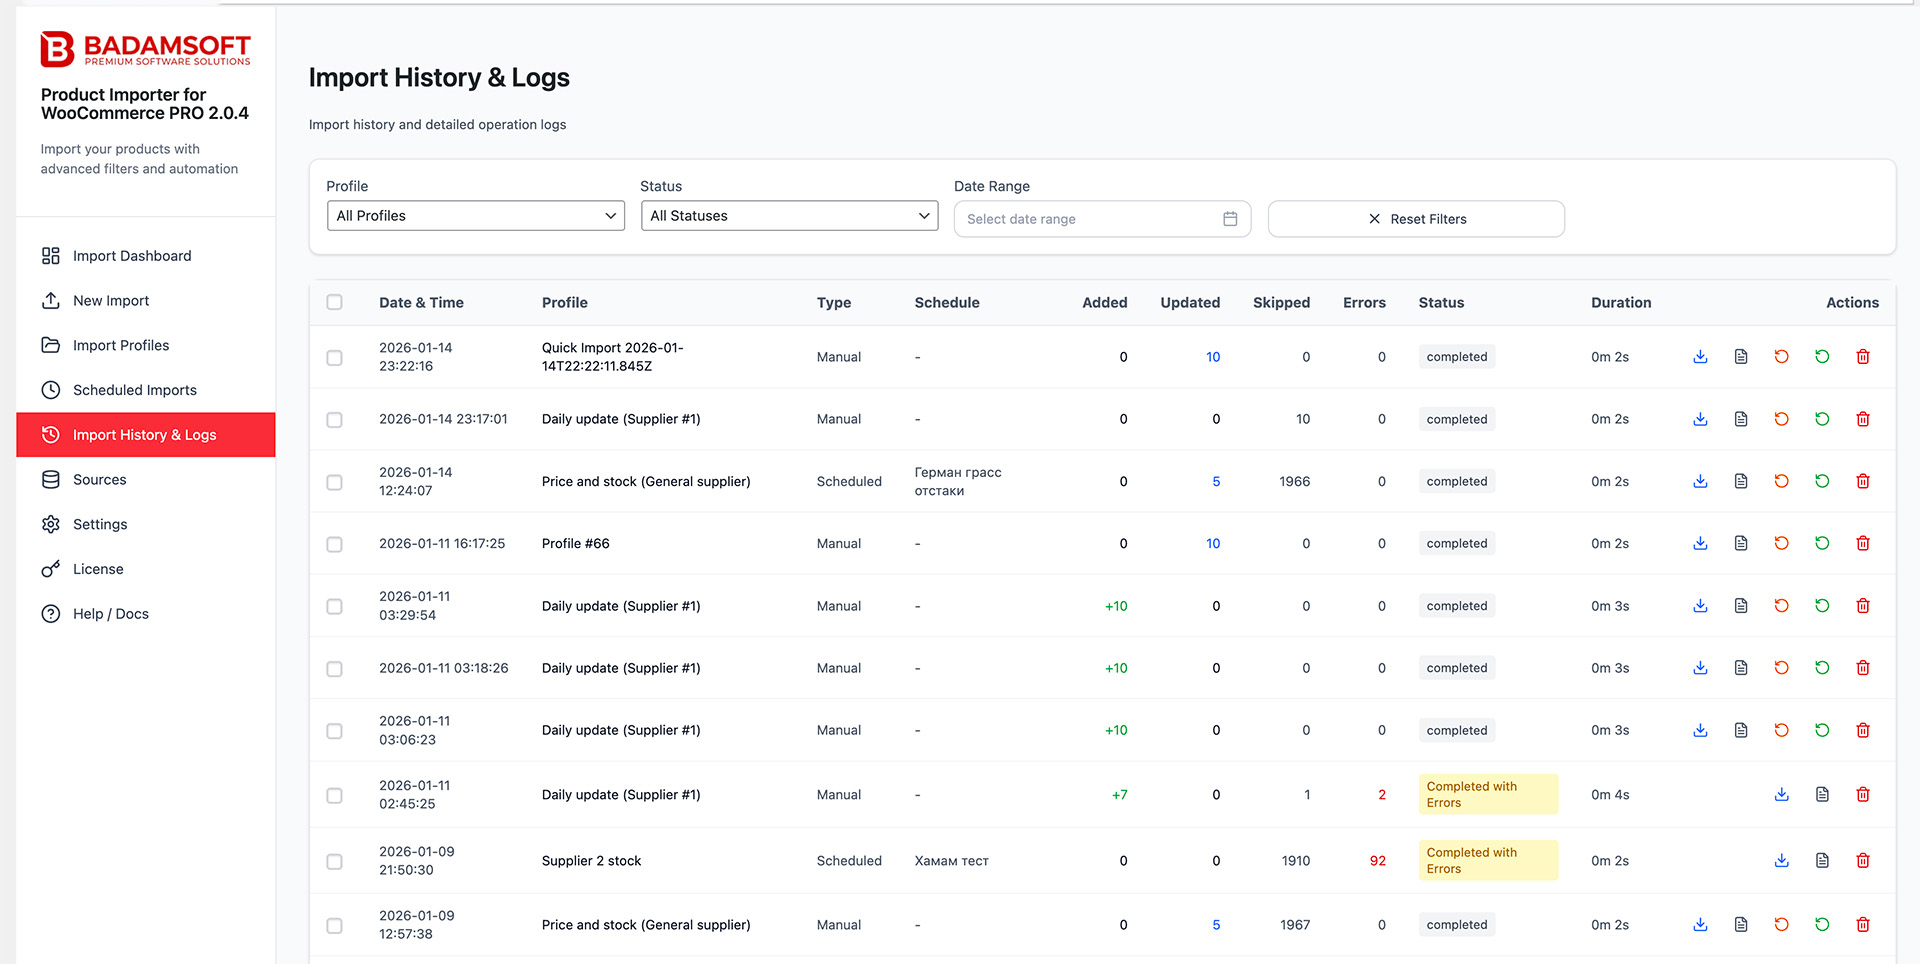
History Table Columns:
- Date: Import timestamp
- Profile: Which profile was used
- Type: Manual or Scheduled
- Status: Success, Partial Entry, or Failed
- Added: New products created
- Updated: Existing products modified
- Errors: Failed rows
View last 12 import operations.
Unlimited history with advanced filtering (by status, date range, profile, type).
Detailed Logs:
Click any import to view detailed log with row-by-row processing results, error messages, and execution time.
What is Rollback Function and Why It's Needed
ProRollback allows you to return products to the state they were in before launching a specific import.
This is insurance for cases when:
- After import, errors were found in data (incorrect prices, descriptions, images, etc.)
- Categories "went wrong", attributes disappeared
- Duplicates were created in bulk
- Simply need to cancel unsuccessful bulk import
Without rollback, the only way to fix the situation is to manually correct thousands of products or re-import the old file (which is often impossible or very time-consuming).
Important: function available only in PRO version.
How It Works (Simple and Clear)
- During any import (when existing products are updated), system automatically makes a "snapshot" of each changed product before making changes
- These snapshots are saved in database and linked to specific import task
- If something went wrong → go to Import History
- Opposite the needed completed import, an orange Rollback button (⟲) appears
- Click → confirm → system returns all updated products to previous state in a few minutes
What Exactly Gets Restored
Practically everything that can change during import:
- Name, description, short description
- Prices (regular and sale)
- Stock, inventory management, stock status
- Dimensions and weight
- Categories and tags
- Main image and gallery
- Attributes (including use for variations)
- Most important meta-fields (GTIN/EAN, upsells, cross-sells, etc.)
What Does NOT Get Restored
- New products created during import (rollback does not affect them)
- Deleted products (if import deleted products — rollback will not return them)
- Changes made manually after import (they will be overwritten with old data)
Where to Find and How to Use (Step by Step)
- Go to side menu → Import History
- Find the needed completed import (status Completed)
- In Actions column, find the orange icon ⟲ Rollback (if no button — either Free version, or import did not create updates, or PRO license inactive)
- Click button
- Confirmation window appears (with number of products to be restored)
- Confirm action
- Wait for completion (can take from 10 seconds to several minutes for large product quantities)
-
Get notification with results:
- ○ how many products restored
- ○ how many failed (and why)
Useful Tips for Using Rollback
- Do rollback as quickly as possible after discovering problem — before other imports have started
- After successful rollback, snapshots are deleted automatically (repeatedly rollback same import is no longer possible)
- Recommended to periodically check snapshot table size (Settings → Maintenance)
- For very large catalogs (>50–100k products), rollback may take longer — run at night
- If you frequently do risky bulk imports — be sure to use PRO specifically for this function
Quick Checklist "When to Use Rollback"
✓ Import completed, but results look incorrect ✓ Bulk errors appeared in prices/stock/categories ✓ Variations or attributes broke ✓ Need to quickly cancel unsuccessful update before store noticed customers ✓ No ability/time to manually fix thousands of products
Rollback is one of the most valuable PRO version functions for those who regularly work with large or critical catalog updates. This is literally an "undo button" for bulk product changes.
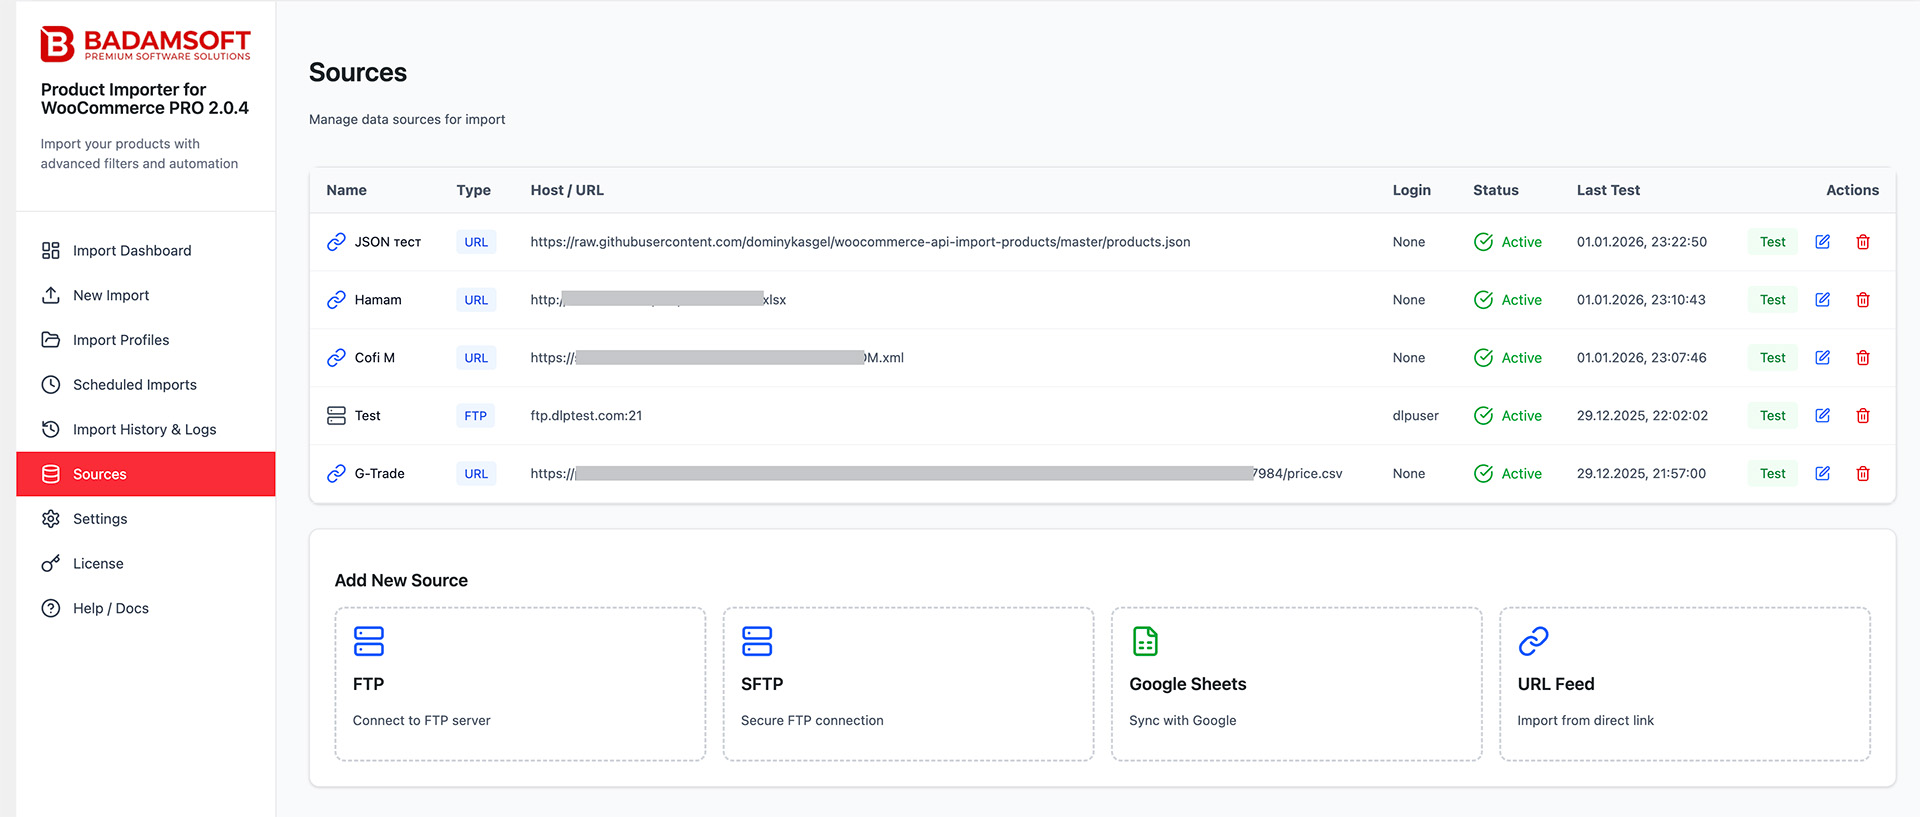
8. Sources (Pro Only)
ProSources is a system of reusable connections to remote data sources. It allows you to configure the connection (credentials, path, authorization) once and then use it in multiple import profiles without having to enter login/password/token each time.
This significantly simplifies working with multiple suppliers, daily updates, or complex supply chains.
Without Sources, every time you create/edit a profile, you would have to re-enter all connection parameters → very high chance of errors and data leaks.
What Free Users See
When navigating to Sources, a large upsell banner is displayed:
- Reusable connections to FTP/SFTP
- Saved URL feeds with authorization
- Google Sheets integration
- Test connection with one click
- "Upgrade to PRO" button
Pro Page Structure
The page consists of the following main elements:
| Block / Element | Location | Purpose | Importance |
|---|---|---|---|
| Success/error notifications | Top (banners) | Show action results: Test, Save, Delete | ★★★ |
| Existing sources table | Central area | List of all created connections | ★★★★★ |
| Create buttons/cards | Top or bottom of table | "Add New Source" → type selection: FTP / SFTP / Google Sheets / URL | ★★★★ |
Sources Table — Main Columns
| Column | What It Shows | Usefulness / Comments |
|---|---|---|
| Name | Human-readable connection name | Most important field — give meaningful names |
| Type | FTP / SFTP / Google Sheets / URL Feed | Instantly clear what protocol |
| Host / URL | Server address or full feed URL | For quick identification |
| Login | Masked login (••••••••) | Security — full password not shown |
| Status | OK / Error / Never tested | Very important for monitoring |
| Last test | Date and time of last successful check | Helps understand if connection is current |
| Actions | Test / Edit / Delete | Main operations |
Available Source Types and Their Fields (2026)
1. FTP
| Field | Required | Typical Values | Recommendation / Warning |
|---|---|---|---|
| Connection name | Yes | "Supplier A — main warehouse" | |
| Host | Yes | ftp.example.com | |
| Port | Yes | 21 (default) | Almost never needs changing |
| Username | Yes | ||
| Password | Yes | Stored encrypted | |
| Remote path | Yes | /products/feed.csv | Specify full path to file or folder |
Recommendation: Use FTP only if SFTP is unavailable (outdated, less secure protocol).
2. SFTP (Highly Recommended)
| Field | Required | Typical Values | Recommendation |
|---|---|---|---|
| Connection name | Yes | "Supplier B — SFTP daily" | |
| Host | Yes | sftp.supplier-b.com | |
| Port | Yes | 22 | Almost always 22 |
| Username | Yes | ||
| Password / Private key | Yes | Password or .pem key content | Preferably key |
| Remote path | Yes | /outgoing/catalog.xml |
SFTP Advantages:
- All traffic encrypted
- Key support without password
- Modern servers almost always offer SFTP
3. Google Sheets
| Field | Required | Typical Values / Instructions | Important Notes |
|---|---|---|---|
| Connection name | Yes | "Google Sheets — Daily stock" | |
| Sheet URL | Yes | https://docs.google.com/spreadsheets/d/ABC.../edit | Must be published or accessible via link |
| Client ID | Yes | From Google Cloud Console | |
| Client Secret | Yes | From Google Cloud Console | |
| (instructions) | — | Link to guide for creating OAuth client in Google Cloud | Very detailed in plugin |
Critical:
- Sheet must be accessible to the app (share with service account or make public for reading)
- Better to create a separate tab just for import
- Avoid frequent structure edits (columns/headers)
4. URL Feed
| Field | Required | Typical Values | Authorization Options |
|---|---|---|---|
| Connection name | Yes | "Supplier C — daily JSON feed" | |
| Feed URL | Yes | https://supplier.com/api/products.json | |
| Authentication type | No | None / Basic Auth / API Key / Bearer Token | |
| Username (Basic) | For Basic | ||
| Password (Basic) | For Basic | ||
| API Key / Token | For Key | Entry location depends on type | |
| Header name (custom) | For custom | Authorization / X-API-Key |
Best Practices for URL:
- Ensure URL returns raw file (CSV/XML/JSON), not HTML page
- For 403 Forbidden — almost always need authorization
- For protected feeds, always save in Sources, not paste each time
Recommended Workflow for Using Sources
- Go to Sources → Add New Source
- Select needed type
- Fill all fields, give descriptive name
- Click Test Connection → wait for green "Connection successful!"
- Save
- When creating/editing profile in New Import → at step 1 select created Source instead of manual parameter entry
- Periodically (every 1–3 months) return and Test all sources
Common Problems & Quick Solutions
| Problem | Most Likely Cause | Where to Look / Solution |
|---|---|---|
| Test → "Connection timed out" | Wrong host / port / hosting firewall | Check data, ask supplier |
| Test → "Authentication failed" | Wrong login/password/key | Recheck (copy again) |
| Google Sheets → "Access denied" | App has no access or sheet not published | Recheck access rights in Google |
| URL → "403 Forbidden" | No authorization | Add Basic Auth or API Key |
| After password change nothing works | Old saved sources not updated | Edit → enter new password → Test → Save |
| Source status "Never tested" | Nobody clicked Test yet | Just test it |
9. Settings
General
FreeDefault import settings: batch size, timeout limits, default matching method, error handling behavior.
Performance
ProChunk size configuration, memory limits, parallel processing options for large imports.
Notifications
ProEmail notifications for import completion, errors, or scheduled task failures. Configure recipients and notification triggers.
Advanced
ProDebug mode, detailed logging, custom field handlers, developer hooks and filters.
10. License
License activation is required only for the Pro version and enables automatic updates, priority support, and full access to Pro features.
Activation Steps:
- Navigate to Settings → License
- Enter your license key from purchase confirmation email
- Click Activate License
License Information:
- License status (Active/Inactive)
- Remaining activations
- Expiration date (if subscription-based)
- Manage Domains button to view/revoke activations
11. Help / Docs
Available in both versions:
- Quick start guide with step-by-step instructions
- Video tutorials for core features
- Full text documentation
- System diagnostics (WordPress, WooCommerce, PHP versions, memory)
- Contact support form
- FAQ section
12. Field Mapping Cookbook: Practical Recipes
Common field mapping scenarios and solutions.
Recipe 1: Basic Product Import
CSV Columns: sku, title, price, stock, description
Mapping:
- sku → SKU
- title → Product Title
- price → Regular Price
- stock → Stock Quantity
- description → Product Description
Recipe 2: Price Update Only
CSV Columns: sku, sale_price
Mapping:
- sku → SKU
- sale_price → Sale Price
Update Logic: Match by SKU, Update only mapped fields
Recipe 3: Categories from CSV
CSV Format: categories column with comma-separated values
Example: "Electronics, Accessories"
Mapping: Drag categories column to Product Categories field
Plugin will automatically create categories if they don't exist
Recipe 4: Image URLs Import
CSV Column: image_url with full URLs
Example: https://example.com/images/product.jpg
Mapping: Drag image_url to Main Image field
Plugin will download and attach images to products
13. Update Logic Explained
Understanding how the plugin decides whether to create new products or update existing ones.
Matching Methods:
1. Match by SKU (Recommended)
How it works:
- Plugin searches for existing product with same SKU
- If found: Updates the product
- If not found: Creates new product
Best for: Most imports. SKU is unique identifier.
2. Match by Product ID
How it works:
- Uses WooCommerce internal product ID
- Directly updates product by ID
Best for: Exports from same site, advanced users.
3. Match by Title
How it works:
- Searches for product with exact same title
- Case-sensitive comparison
Warning: Not recommended. Can cause issues with duplicate titles.
4. Always Create New
How it works:
- Never checks for existing products
- Always creates new products
Best for: Initial catalog import, one-time bulk uploads.
Update Behaviors:
Update all fields:
Overwrites all mapped fields with new values from import file.
Update only empty fields:
Only fills in fields that are currently empty. Preserves existing data.
Skip existing products:
Imports only new products. Ignores products that already exist.
14. Operational Playbook: Daily and Safe Usage
Best Practices:
- Always backup before imports: Use your hosting backup or WordPress backup plugin
- Test on staging first: Never test imports on live site
- Start with small test: Use "Test Import (First 10 Rows)" feature
- Verify field mappings: Double-check all mappings before launch
- Monitor import logs: Check for errors after each import
- Use SKU matching: Most reliable method for updates
Daily Operations Workflow:
- Prepare import file (CSV with clean data)
- Select saved profile or create new import
- Review field mappings
- Set update logic (usually "Match by SKU")
- Run test import with 10 rows
- Verify test results in WooCommerce
- Launch full import
- Check import log for errors
- Spot-check products in store
Common Mistakes to Avoid:
- Importing without backup
- Using "Delete products not in import" without testing
- Mapping wrong columns (e.g., description to title)
- Not checking for errors in import log
- Running large imports during peak traffic hours
15. Scheduled Imports Setup (Pro): Step-by-Step
ProSetup Process:
-
Create and test import profile:
Run manual import first, verify it works correctly, save as profile.
-
Navigate to Scheduled Imports:
Click "Create Task" button.
-
Configure task settings:
- Task name (e.g., "Daily price update")
- Select import profile
- Choose frequency (Daily/Weekly/Monthly/Custom)
- Set time (e.g., 14:30)
-
Enable incremental import (optional):
Only imports products that changed since last run.
-
Configure notifications:
Email on success/failure, Slack webhook, etc.
-
Save and activate task:
Task will run automatically at scheduled time.
-
Monitor task execution:
Check task history and logs regularly.
Tip: Schedule imports during low-traffic hours (e.g., 2:00 AM) to minimize server load impact.
16. Security & Permissions
User Roles & Capabilities:
By default, only Administrators can access the Product Importer. You can configure permissions in Settings → Access Control (Pro).
Administrator:
Full access to all features
Shop Manager:
Can be granted access via Settings (Pro)
Custom Roles:
Configure granular permissions (Pro)
Data Security:
- Uploaded files are stored securely in WordPress uploads directory
- Files are automatically deleted after 30 days
- FTP/SFTP credentials are encrypted in database
- API keys are never logged or displayed in plain text
- Import logs contain no sensitive data
Security Best Practices:
- Use SFTP instead of FTP for remote connections
- Regularly rotate API keys and passwords
- Limit user access to only necessary roles
- Enable WordPress security plugins
- Keep plugin updated to latest version
17. Troubleshooting Quick Index
Common Issues & Solutions:
Import fails with timeout error
Solution:
- Reduce batch size in Settings → Performance
- Increase PHP max_execution_time
- Split large file into smaller chunks
Products not updating, only creating new ones
Solution:
- Verify SKU matching is enabled
- Check that SKUs in import file match existing products
- Ensure SKU field is mapped correctly
Images not importing
Solution:
- Verify image URLs are accessible (test in browser)
- Check WordPress uploads directory permissions
- Ensure allow_url_fopen is enabled in PHP
- Try using direct URLs instead of relative paths
Categories not created automatically
Solution:
- Check category names for special characters
- Use exact category names (case-sensitive)
- Enable "Create categories if not exist" in Settings
CSV file not parsing correctly
Solution:
- Try different delimiter (comma, semicolon, tab)
- Check file encoding (should be UTF-8)
- Remove BOM (Byte Order Mark) from file
- Ensure no empty rows in CSV
Scheduled imports not running
Solution:
- Verify WordPress cron is working (check System Status)
- Check server time zone matches WordPress settings
- Ensure task is enabled (not paused)
- Review task logs for error messages
Getting Help:
If you cannot resolve the issue:
- Check Help / Docs page for video tutorials
- Review import logs for detailed error messages
- Contact support with: WordPress version, WooCommerce version, PHP version, error log
- Pro users: Priority support via email or live chat
Ready to streamline your WooCommerce imports?
Get started with Product Importer today!